Utilidades

Vibele, los merengues alemanes


En Alemania se escriben Wibele pero al pronunciarlas a los españoles nos suena a "Vibele". El nombre procede del apellido Wibel, el pastelero creador de la receta.

Esta receta procede de la región llamada Franconia que en la actualidad está repartida entre varios estados federales aunque la mayor parte se encuentra en Baviera. La ciudad más importante de Franconia es Nuremberg. En la actualidad las Wibele se consideran una receta de la gastronomía suaba. De hecho se conoce popularmente como Schwäbische Wibele (wibele suabos). 

Este pequeño merengue duro es de apenas unos 2 cm de longitud con una forma de "ocho" muy característica y distintiva. 

Necesitan muy pocos ingredientes y son fáciles de hacer.

INGREDIENTES :  

  • 250 gramos de azúcar glass  
  • 200 gramos de harina blanca de trigo  
  • 5 claras de huevo  
  • 1 cucharada colmada de azúcar vainillado  
  • 1 pellizco de sal  
  • Unas gotas de zumo de limón

En primer lugar batimos las claras con unas gotas de zumo de limón y un pellizco de sal hasta que quedan montadas. Han de quedar muy firmes, de manera que al dar la vuelta al bol las claras queden pegadas al mismo y no caigan. 

Tamizamos el azúcar, la harina y el azúcar vainillado, mezclandolas en un bol. Añadimos entonces las claras montadas y batimos bien para obtener una masa homogénea. 

Llenamos con la masa resultante una manga pastelera, boquilla pequeña, y a continuación sobre un papel sulfurado (o papel de hornear) depositamos una pequeña bolita de masa. 

A continuación, justo al lado de la anterior, depositamos otras bolita del mismo tamaño que se adherirá por cercanía a la primera. Esto formará la típica forma de ocho de estas galletas. Terminamos la masa contenida en la manga pastelera y dejamos reposar toda la noche para que endurezca (8 horas). 

Recordad que la longitud máxima es de unos 2cm. A las 8 horas precalentamos el horno a 180 grados y colocando las galletas en la parte central del horno las dejamos unos 6 minutos.

Se toman frías y son una delicia, lo mejor para acompañar el té o el café.

Rose di Pasta Sfoglia

Le rose di pasta sfoglia sono un dolce tipico di Alcalá de Henares, la città vicino a Madrid dove nacque Miguel de Cervantes, creatore del Quidjote. Ho detto "dolce" anche se in realtà si possono fare delle roselline salate con prosciutto o formaggio. Anche se guardando la fotografia può sembrare complicato ottenere la forma, la verità è che è molto semplice da fare.

Faremo delle rose con la marmellata di pesche e altre con la nutella, anche se possono essere fatte con fettine di mela, burro, ecc. Quelli salati sono ancora più facili da fare, potendo utilizzare, come abbiamo detto prima, prosciutto, formaggio, salami, tra molti altri. Il limite è l'immaginazione che metti alla cucina.

INGREDIENTI

  • 1 foglio di pasta sfoglia
  • Mezzo bichiere (100 ml) di marmellata di pesche
  • Mezzo bicchiere (100 ml) di nutella
  • Bicchiere di zucchero
  • 1 uovo (facoltativo)
  • Cartine per cupcake grandi (facoltative)

Se la pasta sfoglia è congelata, scongelatela in frigorifero, mai fuori. In caso contrario, toglietela dal frigo circa 15 minuti prima di iniziare la preparazione.

Stendere la teglia su carta da forno (generalmente la confezione che avete acquistato l'ha già incorporata).

Tagliamo strisce longitudinali lunghe circa 20 cm e larghe circa 6 cm. Sono le strisce che arrotoliamo per fare le rose.

Mettere nel microonde la nutella e la marmellata, la prima mescolata con un cucchiaio di latte e la seconda con un cucchiaio di acqua. Diamo circa 15 secondi e mescoliamo bene. In questo modo possiamo dipingere meglio le sfoglie di pasta sfoglia.

Della larghezza della striscia (6 cm) ne dipingiamo solo la metà (3 cm), alcuni con la nutella e altri con la marmellata. Non è necessario renderlo molto sottile, meglio spesso.

Raddoppiamo la larghezza della striscia su se stessa. Cioè quando lo pieghi, ci sarà una striscia di lunghezza pari a quella che era (20 cm) ma con una larghezza di soli 3 cm.

Con la parte aperta della piega verso l'alto (ovvero dove si vede il ripieno) fare una spirale libera con la striscia di pasta sfoglia. Puoi posizionare le spirali in grandi carte da stampo per cupcake anche se non è del tutto necessario.

Dai alla spirale una certa forma di petali di rosa anche se non preoccuparti, quando sarà cotta sarà in una forma migliore.

Se vuoi, puoi dipingere l'esterno con tuorlo d'uovo per renderlo più luminoso, anche se non è necessario. Disporre le rose su carta da forno.

Preriscaldiamo il forno a 190 gradi e cuociamo le roselline per circa 20 minuti (guardate il foglietto illustrativo della pasta sfoglia per vedere che indicazione mostra il produttore, a volte è di più ea volte di meno).

Quando la pasta sfoglia è gonfia e ben rosolata, si può togliere.

Fate raffreddare e spolverizzate sopra lo zucchero a velo.

Se vuoi renderli salati, sostituisci la marmellata e la nutella con qualsiasi ingrediente salato che desideri.

Salate o dolci, queste rose di Alcalá sono una delizia per il palato.

Cake of Santiago


The Camino de Santiago leads to the city in the north of Spain with the homonymous name, where the remains of the Apostle rest. If you have been there, done the route or just visited Galicia (the region of northwestern Spain with a language similar to Portuguese) you probably already know this impressive cake.

The Santiago cake probably has its origin in the Middle Ages. In spite of that, what can be verified through documents is that the date of birth of the Santiago cake is 1577 due to the references of a document on the nutrition of the teaching staff at the University of Santiago de Compostela, although it is not until the 19th century in that the recipe takes the current form. The decoration with icing sugar and the cross of Santiago is even more modern, being introduced in 1924.

There are two types of Santiago cake: the simple ones and the lined ones. The lined ones consist of a base of puff pastry or shortcrust pastry. Unmolding the simple ones is sometimes complicated, so you have to spread the base well with butter or, better yet, use a removable mold or a baking paper liner.

The recipe is really simple. The norm says that you have to use 33% ground almonds, another 33% sugar and 25% egg. If you add the percentages you get 91%. The remaining 9% is made up of the zest of the skin of a lemon and other flavorings that can be cinnamon, sweet wine, brandy or pomace brandy. Naturally, that 9% can be a very important amount if we are talking about 1 kg cakes, for example. It remains then to supplement the remaining weight by adding more almonds, sugar or egg. Personally, I am always inclined to use lemon and Galician pomace brandy and no cinnamon or other liquors. Galician orujo is a product of the land of the cake and gives it a very special aroma. Use a good pomace brandy. To check if it is of quality, simply place a small amount in the palm of your hand and rub with the other until it evaporates. Then you put your hands to your nose: the only aroma that should remain is that of the grape.

Some recipes introduce wheat flour and not precisely to make the lining (which it use it for sure). The authentic Santiago cake does not contain flour. Not even a tablespoon. Flour was added to reduce the amount of ground almonds and thus lower costs, although it may have an effect that some see as positive by making the cake more spongy (due to the action of gluten). If we want to make the cake somewhat fluffy, we can work it with the rods so that the trapped air inflates the result, it is not necessary to incorporate wheat flour.

Since the ingredients of the cake work with an easy proportion and there is no yeast, it is possible to make very large cakes or small tartlets the size of a cupcake. My experience says that it is easy to measure equal amounts of almond and sugar but it is not so easy to balance the proportion with the eggs. There are very large eggs and some very small ones. Sometimes we will need 4 and other times 6 eggs. I usually solve the problem by weighing the eggs and choosing the appropriate amount empirically.

INGREDIENTS (cake of just under 1 Kg / 2.2 lbs, approximately)

  • 300 grams (10.5 oz) of ground almonds 
  • 300 grams  (10.5 oz) of conventional white sugar
  • 5 or 6 medium eggs
  • the grated skin of a lemon
  • 1 small glass or splash of Galician pomace brandy
  • Sugar glass
  • Butter

In a bowl, beat the eggs. Gradually add the ground almonds, beating well so that there are no lumps. Then we do the same with the sugar. Finally we add the flavorings and mix well with the help of a wooden spoon. You have to work it so that it is well mixed and much more if we want it to take on volume, although this is not essential.

Now we take a removable mold of 22 cm (9 inches)  in diameter and grease it with butter so that it is easy to unmold. Preheat the oven to 180 degrees (356 F) and introduce the dough until the surface is toasted - not burnt - and when you stick a toothpick it comes out dry. 45-60 minutes of baking should be enough.

Remove from the oven and let cool before unmolding. Unmold and cover with icing sugar. If you are excited you can cut a cross of Santiago on a sheet of paper and sprinkle the glass on it to obtain the negative image. This way it will look like it was done by a professional.

The tart is well done when displayed with a roasted top and the interior is aromatic, tender and soft, with a strong almond predominance.

Pescado frito de Hamburgo con Patatas (Hamburger Pannfisch mit Bratkartoffeln)


El nombre, que se pronuncia fonética en español como Jambúrguer Panfíx, procede del dialecto alemán utilizado en el norte del país donde Pfannes es sartén, fisch es pescado y Hamburger es, como sabéis, la ciudad de Hamburgo.

Básicamente se trata de pescado frito servido con salsa de mostaza

Como el nombre indica, se trata de una preparación típica de la ciudad de Hamburgo que destaca siempre, por su cercanía al mar, por la cocina de pescado.

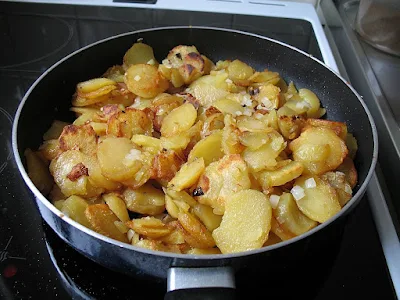
El pannfisch se suele realizar con arenque, solla o bacalao - en realidad con abadejo, al que a menudo se hace pasar como bacalao -    el cual se fríe y luego cubre con una salsa de mostaza. Aunque no es obligatorio, el plato se suele complementar con bratkartoffeln (patatas fritas con tocino y cebolla). 

Así, la composición habitual del plato es una base de bratkartoffeln , encima el pescado y todo ello bañado con salsa de mostaza, aunque también es corriente que la salsa se sirva por separado y sea el comensal quien disponga de la misma a placer. Es uno de los mejores platos de pescado que existen.

Por cierto, en Hamburgo no busquéis las famosas hamburguesas porque no existen con tal nombre. La receta original de las hamburguesas se llama "buletten". Cuando en los Estados Unidos vieron que los emigrantes alemanes, la mayoría de los cuales partían del puerto de Hamburgo, comían buletten, llamaron a aquella preparación de carne picada como hamburguesas.

INGREDIENTES (4 personas)

  • 4/8 filetes de solla, arenque, abadejo, bacalao etc.*
  • 250 ml de leche
  • 100 ml de nata para cocinar (185 MG)
  • 2 cucharadas de mostaza fuerte
  • 1cucharada de mostaza granulada**
  • 1 cebolla morada pequeña
  • 1 cucharada de mantequilla
  • 1 pellizco de azúcar
  • Harina blanca de trigo
  • Aceite de girasol, maíz o canola
  • Sal
  • Pimienta negra molida

Para hacer las bratkartoffeln


* Lo corriente es servir 200 gramos de pescado por comensal, sea cual sea el tamaño de la suprema adaptaremos las unidades a servir con el peso objetivo. A menor tamaño del pescado, más cantidad de filetes.

** Se trata de un tipo de mostaza común en Alemania y Francia más tosca que la habitual porque todavía se perciben los granos de los que se extrae. Se puede obviar usando un poco más de mostaza fuerte, aunque en la receta original se emplea este tipo.

Picamos la cebolla y la freímos en una cucharada de mantequilla . Cuando transparenta añadimos una cucharada de harina que también tostaremos. Cuando se vuelva de color marrón incorporamos la leche y llevamos a ebullición. Bajamos a continuación la potencia del fuego y cocinamos durante 5 minutos, momento en el que retiramos.

Inmediatamente añadimos la nata para cocinar, la mostaza, sal, pimienta negra molida y el pellizco de azúcar, removiendo bien. Reservamos, procurando que no se enfríe (podemos tenerlo al fuego mínimo o bien en el horno a 50 grados como máximo).

Lavamos las supremas de pescado, las secamos, salpimentamos y enharinamos. Las freímos a continuación por ambos lados durante 2 ó 3 minutos, hasta que quedan doradas. Para esta fritura emplead el aceite vegetal y una vez terminada colocáis las supremas sobre papel absorbente para eliminar el exceso de grasa.

****


Para hacer las bratkartoffeln :

  • 1 Kg de patatas
  • 100 gramos de mantequilla sin sal
  • 200 gramos de bacon en tiras (opcional)
  • 2 cebollas moradas (opcional)
  • Sal
  • Pimienta negra
  • Cebollino, alcaravea (opcional)

Lo mejor es emplear patatas que resistan bien la cocción sin romperse. Por tanto se debe emplear patata monalisa, nueva o kennebec si hacéis la receta en España mientras que en Alemania se emplearían de tipo linzer, kipfler o sieglinde, entre otras.

Lo primero a hacer es hervir las patatas con piel. Se lavan bien y se introducen en una olla con un puñado de sal y agua a ras.

Dependiendo del tamaño de las patataspueden estar hechas entre 30 y 50 minutos, con la tapadera puesta y a fuego medio. Para comprobar que están cocidas se pinchan con un cuchillo de manera que la hoja debe penetrar aunque no con la facilidad con la que entraría en una pieza de mantequilla caliente (deben quedar firmes).

Una vez se enfrían lo suficiente para ser tocadas procedemos a pelarlas.

Lo mejor en este caso es dejar que una vez peladas enfríen del todo, incluso que se guarden en el frigorífico, para proceder a freírlas al día siguiente. Si no podéis esperar tanto, al menos hacedlas cuando se hayan enfriado del todo. Es importante que estén firmes y frías a la hora de freírlas.

En primer lugar vamos a freír las patatas en mantequilla clarificada. Así evitaremos que se queme a la temperatura a la que freiremos las patatas, que suele ser alta. Si el uso de mantequilla os pone un poco los pelos de punta, podéis sustituirla por aceite de oliva o mezclar mantequilla normal con el mismo, alcanzado un punto de temperatura óptimo sin que se queme pero sin renunciar al sabor que en principio deben tener estas patatas alemanas.

Para clarificar mantequilla basta con calentar la mantequilla en una cazuela hasta que funda en su totalidad. Se deja reposar y  en unos segundos el líquido amarillento se habrá estratificado en tres capas. La superior es como una espuma que se puede eliminar con una espumadera o empleando una cucharilla. La siguiente, más clara y en mayor cantidad, es la mantequilla clarificada que se separa del suero del fondo por simple decantación.

Se cortan las patatas en rodajas de medio centímetro de grosor. Es importante que todas las rodajas tengan el mismo grosor para que se frían a la vez.

Se vierte parte de la mantequilla clarificada en una sartén a fuego medio-fuerte. Cuando está bien caliente freímos las patatas procurando no amontonarlas y que no se toquen entre ellas. Como son de cierto grosor lo normal es dejar unos 3 minutos por cada lado, hasta que los bordes se oscurecen. Procedemos así con todas las rodajas. Una vez se extraen se dejan reposar en un papel de cocina para que absorban el exceso de mantequilla.

En otra sartén también con un poco de mantequilla clarificada freímos la cebolla cortada en aros hasta que se pone crujiente.

En la misma sartén salteamos el bacon en tiras. No siempre se añaden estos ingredientes pero se suele hacer si va a constituir un plato entrante.

Finalmente mezclamos las patatas fritas con la cebolla y el bacon, salpimentándolo todo al gusto.

También es costumbre añadir cebollino picado y semillas de alcaravea.

Si no queréis usar mantequilla clarificada, podéis freír las patatas en aceite añadiendo una cucharada de mantequilla para darle un sabor muy parecido a la receta original pero con menos aporte de calorías.

*****

Si habéis preparado patatas fritas las disponéis en el fondo del plato, encima las supremas de pescado y se baña todo con la salsa de mostaza, todo ello bien caliente.

Con esta receta es difícil que alguien se niegue a comer pescado.

Riz noir

Le riz noir est un plat typique de la cuisine méditerranéenne espagnole, mais il est également présent dans d'autres cuisines européennes qui partagent le même littoral. La principale différence avec la paella est l'absence de légumes - à l'exception du sofrito - et bien sûr la couleur noire que lui donne l'encre de seiche.


INGRÉDIENTS (4 convives) :

  • 2 ou 3 calamars
  • encre de seiche
  • 1 douzaine de crevettes
  • 1 verre de riz 
  • 1 tomate mûre
  • 1 gros oignon
  • 1 gousse d'ail
  • Bouillon de poisson (un demi-litre)
  • Poivre noir
  • Le sel
  • Huile d'olive vierge extra

Si vous achetez du calamar frais entier, nettoyez-le bien en enlevant la peau, enlevez le cartilage et réservez soigneusement l'encre. S'il s'agit déjà d'encornets nettoyés ou congelés, vous devrez acheter l'encre séparément, soit congelée, soit par l'intermédiaire de votre poissonnier habituel.

Couper le calmar en morceaux relativement petits. Nettoyez les crevettes en taillant les antennes. Il y a des gens qui les mettent entiers tandis que d'autres préfèrent faciliter le dîner en enlevant la coquille et en nettoyant les intestins. Ça va au goût

Incorporer tous les poissons dans une cocotte ou une poêle à paella avec de l'huile et faire revenir pendant quelques minutes, juste assez pour qu'il prenne de la couleur. Retirer et réserver.

Hachez finement l'oignon et l'ail sans le germe vert. Ajouter un peu de sel pour faire suer l'oignon.

Lorsque l'oignon est transparent, ajouter la tomate hachée sans peau ni pépins et un peu de poivre noir. Il est temps d'ajouter le riz et de le faire revenir brièvement, afin qu'il soit bien imprégné de sauce. Ajoutez encore un peu de sel. Quelques minutes de travail du riz suffiront amplement.

Nous réincorporons uniquement les encornets hachés. Les crevettes sont mises presque à la fin.

Verser le bouillon de poisson préalablement chauffé et laisser cuire à feu vif environ 5 minutes. Ensuite, baissez le feu à puissance moyenne et laissez cuire environ 15 à 20 minutes. Cinq minutes avant la fin de la cuisson, ajouter les crevettes et les sachets d'encre. Remuez bien et éteignez le feu.

Couvrir la poêle à paella avec un chiffon en coton et laisser reposer 5 à 10 minutes. Prêt à servir accompagné d'un bol d'aïoli ou de quelques tranches de citron, au goût.

Aragonese-style cod meatballs

In the Middle Ages, the Church forbade eating meat and other foods during the Lenten period as an act of penance for the death of Jesus Christ. The meals had to be frugal and the attitude of recollection. This was relatively simple to carry out since most people were starving and in reality they celebrated Lent 365 days a year without knowing it.

However, people managed to get around the ban and even the ecclesiastics frequently reviewed the prohibited foods to apply new rules that would allow them to eat protein without offending the Church. Thus in Germany it was considered that eating snails did not break respect for Lent because in reality a snail is not meat. In other places it was considered that eating beaver was not a sin because, although it was a mammal, it lived in the water, with disastrous results for the species that is still almost extinct in Europe today. And it is that some of the arguments that were used to justify exceptions to the rule were of real blush

In the 15th century it was ruled that eating fish was not admonishable either, so the first fish farms were started in Central Europe, generally linked to monasteries, and from where the custom of eating carp at Christmas throughout the area comes from.

The rest of the European countries that did not have large rivers or abundant fluvial species threw themselves into the sea to fish. Since it was not possible to bring the fish ashore immediately, and even if it were, it would have spoiled in a very short time, some means of preservation had to be used. The most widespread was salting, used above all with the cod that abounded in the waters of the North Sea. The technique had been used since ancient times by the Vikings but was massively adopted by Basque, Portuguese, French and English fishermen because salt was relatively easy to obtain in their countries of origin. The papal bull ensured that already at the beginning of the 16th century there were cod salting factories installed by the Basques on the Canadian coast. Such was the demand that the Icelanders dedicated - and still do - all the cod fishery for export so that they almost do not eat it. In fact, until recently they didn't even have recipes that had cod as an ingredient and they must have copied them from the Portuguesers and Spaniards.

Cod was for many centuries the only fish that the poor could afford and it was not until well into the 20th century, with the industrialization of dry ice, that fresh fish reached everywhere.

By then an intense gastronomy had already developed around cod, especially in countries such as Portugal, Spain, France and Italy.

The Aragonese-style cod meatballs are one of those culinary treasures that, as you can see, owes its appearance to gluttonous priests who were looking for a way to break their own rules.

Aragon is a region in Spain with Zaragoza city as capital. It does not have coast line.

INGREDIENTS (4 people)

  • 500 grams (1.1 lbs) of potatoes
  • 300 grams (10 oz)  of salted cod
  • 2 large ripe tomatoes
  • 2 eggs
  • 2 cloves of garlic
  • Chopped parsley
  • Salt
  • Wheat flour
  • extra virgin olive oil
  • Optional: a hot pepper

First of all we desalt the cod, preferably loin so as not to have to go looking for and removing the bones, in plenty of water that we will change every 6 hours for 24 hours.

Once the time has elapsed, we extract the cod and let it drain for a while.

Boil the potatoes in their skins until they can be easily pierced with a fork.

Let them cool a bit and peel them, crushing them with a fork.

We make crumbs pieces of cod, looking for and removing the bones if any, and mix them with the potatoes. We chop the garlic cloves removing the green germ and we also introduce them.

Add the two eggs without beating. We mix well.

Here we can add a little salt, but only a pinch. Although we have desalted the cod it is still quite salty, so be careful.

We separate from the dough balls the size of a ping pong ball. We coat them in wheat flour and fry them in plenty of oil until they are well browned on all sides. We remove and reserve.

In a frying pan with a couple of tablespoons of oil, fry a level tablespoon of flour. When it has fried - it turns brown - we add the peeled and seedless tomatoes, chopped or grated. If you want the sauce to be spicy, add a sliced ​​red chilli.

Add the meatballs to the pan and add a little water so that it covers them halfway and a little more.

Let do 15 minutes and ready to eat. It is a dish that is just as good cold as hot.

Pollo Kiev


No me he inventado la receta, realmente existe un "Pollo Kiev", casi más famoso fuera que en la misma Ucrania. 

A estas horas Ucrania está viviendo una auténtica pesadilla que espero acabe pronto y de la manera que a los ucranianos les gustaría que acabara. A ellos y a todos los que amamos la libertad y la democracia, claro.

Se trata de unas pechugas de pollo rellenas de una mezcla de mantequilla con ajo y perejil que se rebozan y finalmente acaban en el horno. Un plato realmente bueno.

Valga esta receta como pequeño homenaje a Kiev y a Ucrania. 

INGREDIENTES (4 personas) 

  • 4 pechugas de pollo grandes, deshuesadas y sin piel
  • 50 gramos de mantequilla sin sal
  • 4 cucharadas de eneldo picado*
  • 1 diente de ajo
  • Harina de trigo (para rebozar)
  • 2 huevos (para rebozar)
  • Pan rallado (para el rebozado)
  • Sal
  • Pimienta negra molida
  • Aceite de girasol, maíz o canola (para freír)

* Si no tenéis eneldo picado se puede emplear perejil y si queréis que tenga un relleno más mediterráneo se puede usar orégano, hierbas provenzales etc.

En un bol batimos la mantequilla a punto pomada (no líquida ni demasiado blanda) con el eneldo y el diente de ajo muy picado y sin el germen central. Salpimentamos.

Colocamos una hoja rectangular de papel film en la mesa de la cocina y dentro introducimos la mezcla anterior formando, más o menos, un cilindro alargado. 

Cerramos el papel film y llevamos al congelador durante 30 minutos.

Mientras preparamos las pechugas.

Las abrimos con un corte mariposa, es decir, abiertas como un libro sin que se lleguen a separar las mitades. Las aplanamos con ayuda de un rodillo.

Salpimentamos el interior y el exterior de las pechugas.

Extraemos el cilindro de mantequilla y lo cortamos en cuatro partes iguales.

Introducimos cada una de dichas partes en el interior de las pechugas. Enrollamos la carne sobre el cilindro de mantequilla hasta que toma a su vez una forma cilíndrica. Para que os hagáis una idea, es como enrollar una alfombra.

Colocamos cada cilindro de carne en el interior de una papel film de plástico bien prieto y lo llevamos al congelador durante otra media hora.

Extraemos del congelador y los empanamos.

Para ello primero los rebozamos en harina, luego en huevo batido y finalmente en pan rallado. Salpimentamos el exterior.

En una sartén con abundante aceite vegetal freímos los rollos de pollo hasta que quedan dorados. No os preocupéis de que el interior quede crudo porque los terminaremos en el horno.

Escurrimos el pollo en una rejilla o sobre un papel absorbente.

Precalentamos el horno a 200 grados e introducimos los "kievs" durante 20-30 minutos.

Extraemos y listos para comer, acompañados de verduras o patatas fritas.


Liebe Salat

Dieses Rezept wurde mir von Ayshe Molina gegeben, die es wiederum auf einem Salat basiert, der bis vor kurzem in der spanischen Restaurantkette Vienna erhältlich war.

ZUTATEN (4 Personen)

  • 200 Gramm gekochte Kichererbsen
  • 1 kleine Rübe*
  • 200 Gramm Kaiserschoten
  • 200 Gramm runde grüne Bohnen
  • 200 Gramm Edamame (wird immer tiefgekühlt gekauft)
  • 200 Gramm Rotkohl
  • 70 Gramm Quinoa
  • 50 Gramm frittierte Cashewnüsse
  • 8 Zweige Grünkohl
  • 1 Zitrone
  • 8 Esslöffel natives Olivenöl extra
  • 1 Esslöffel Weinessig
  • 1 Esslöffel Honig
  • 1 Esslöffel starker Senf (französische Art)
  • 1 Esslöffel gehackte Petersilie
  • Salz

* Je nach Verfügbarkeit können Sie frische Rüben oder Rüben in Essig verwenden, vorzugsweise jedoch die erste.

Zuerst kochen wir das Gemüse und die Quinoa, die gekocht werden müssen, wir mischen sie mit den restlichen Zutaten, die frisch verzehrt werden, dann fügen wir Rote-Bete-Hummus hinzu und würzen schließlich mit einer Honig-Vinaigrette.

edamame :

Einen Topf mit mindestens 2 Liter Wasser auf das Feuer stellen und zum Kochen bringen. Wenn das Wasser zu kochen beginnt, gießen wir sie hinein und lassen es 4 Minuten lang bei starker Hitze kochen. Wenn die Zeit abgelaufen ist, nehmen wir sie heraus und bringen sie in eine Schüssel mit fast gefrorenem kaltem Wasser. Wir reservieren.


Kaiserschoten :


Sie werden genauso gekocht wie Edamame, sodass wir dasselbe Wasser nutzen können, in dem wir sie gekocht haben. Wenn wir die Edamame entfernen, fügen wir einfach die Kaiserschoten hinzu und lassen sie etwa 4 Minuten einwirken und bringen sie dann in fast gefrorenes kaltes Wasser. Sie sollten zart, aber knackig sein. Al dente, um ein Gleichnis zu verwenden, das mit Nudeln verwendet wird. Wir reservieren.


Runde grüne Bohne:


Genau das gleiche wie wir es mit Edamame und Kaiserschoten gemacht haben, obwohl in diesem Fall 5 oder 6 Minuten lang gekocht wird. Kaltes Wasser und Reserve.

Grünkohl :


Wenn Sie Glück haben und zarte Kohlzweige perfekt finden, weil sie nicht gekocht werden müssen. Aber wenn sie zu hart sind, können Sie sie im gleichen Wasser kochen, bis sie weich sind (ca. 7 Minuten). Denken Sie daran, dass Gemüse fertig ist, wenn es weich, aber noch knackig ist. Zu weich verlieren sie alle ihre Eigenschaften.


Andenhirse:


Quinoa in reichlich fließendem Leitungswasser waschen und in ein Sieb geben. Sobald wir das Saponin entfernt haben, das ihm einen bitteren Geschmack verleiht, kochen wir es 15 Minuten lang in demselben Wasser, das zuvor verwendet wurde. Da wir kein kochendes Wasser mehr benötigen, gießen wir es wieder über das Sieb und sammeln den bereits gekochten Quinoa auf. Abkühlen lassen und reservieren.


Rüben-Hummus zubereiten:

In das Mixglas die gekochten Kichererbsen, die geschälten und geschnittenen Rüben sowie den Saft einer halben Zitrone und vier Esslöffel Öl sowie einen Teelöffel Salz geben. Schlagen, bis es glatt und klumpenfrei ist.

Wenn wir rote Bete in Essig verwenden, gehen wir genauso vor, lassen die Essiglake so weit wie möglich ab und fügen den Zitronensaft nicht mehr hinzu, weil er dann zu sauer wäre.

Honig-Senf-Vinaigrette:

Mischen Sie in einer Schüssel 4 Esslöffel natives Olivenöl extra, 1 Esslöffel Weinessig, 1 Esslöffel Honig (es ist besser, ihn in der Mikrowelle leicht aufzuweichen) und einen weiteren Esslöffel starken Senf. Gut mischen und reservieren.

Jetzt können wir den Salat zusammenstellen:

Auf jeden Teller legen wir die Grünkohlzweige als Unterlage. Dann die Quinoa, die Erbsen und die Edamade sowie die runde Bohne.

Mit einer Mandoline oder einem scharfen Messer schneiden wir den Rotkohl in dünne Streifen und legen ihn darauf.

Alles mit der Honig-Vinaigrette abschmecken.

Lassen Sie uns ein paar Esslöffel Rüben-Hummus gießen. Etwas frittierte Cashewnüsse und gehackte Petersilie darüber streuen.

Fertig für den Verzehr. Abgesehen davon, dass es gut ist, sehr gesund.

Greek style bahmies (okra)

This is a vegetable recipe that uses okra as a base element, which is widely consumed in Africa, America, the Middle East, the Balkans, Russia and South Asia. That is, everywhere except Western Europe.

The okra receives different names depending on where we are. In Africa it is usually called gombo, in America okra and in the Middle East and the Balkans it is called bahmie or bahmia. In Greece it is consumed regularly and is also called bamies. In America it is consumed in the Caribbean area, Brazil and the South of the United States.

At first glance it looks like a small green pepper but if you look closely you can see that the section is pentagonal in shape and the color is less intense. It certainly has nothing to do with peppers.

Okra is the fruit of a plant related to cotton. It is native to East Africa from where it spread to the Middle East and the West of the continent, where it is highly appreciated. The slave trade brought it to America while by various means it reached the rest of Asia. The Ottoman Empire facilitated its introduction to the Balkans, Greece and Russia.

As I have already said, it is a small vegetable (about 5 cm / 2 inches, those larger than this size are too hard) with a pentagonal section. When making a cut, five cavities are observed, each of which contains seeds with which a coffee substitute is made that does not contain caffeine. When cutting it, we will also observe a peculiarity that makes okra an essential ingredient for stews. It secretes a viscous substance that when cooked generates a pseudo gelatin. For this reason it is widely used to thicken meat stews. We simply buy small-sized okra, we cut the tips and "tails" so that the gelatinous substance comes out and we can add them to any stew, with an effect similar to or superior to that of animal-derived jellies.

The okra is consumed inside the stew like any other vegetable, although always making sure that they are small in size because the large ones are too hard. In other cases they are cooked as they are, without being part of anything, just as if we were making tender beans, artichokes or Brussels sprouts. This is the case of the Greek recipe that we are dealing with.

Okra is found in Middle Eastern markets in fresh but also frozen form. The same thing happens with frozen ones as with peas: they are less hard. So using frozen okra the cooking time is significantly reduced.

This is an extremely common vegetable, almost vulgar we would say, in the area. It provides us with the usual nutrients of vegetables, its contribution in fiber, vitamin C, magnesium, vitamin B and calcium being remarkable.

INGREDIENTS

  • 1kg (2.2 lbs) okra (frozen)
  • 2 cups of crushed tomato
  • 1 purple onion (sweet)
  • 1 cup of vinegar
  • 1 clove garlic
  • Salt
  • ground black pepper
  • Chopped parsley
  • extra virgin olive oil


Keep in mind that in this case frozen okra has been used. If it were fresh, the cooking times would be longer.

First, we pour the okras into a colander and pass them through running tap water. Then we pour them into a bowl or basin and soak them with the vinegar and salt. They must be well impregnated. This is done to remove the external stickiness due to the mucilage. That is, if you do not do this process, it seems that the okra "drools". If the okra is used to thicken a stew, the external mucilage does not matter too much, but in this case, since it is the majority in this stew, it is preferable to eliminate it (the mucilage is not harmful and nothing happens with it, it is simply sticky).

In a deep pan add a generous stream of olive oil and in it fry the finely chopped onion and the garlic clove - without the green germ - also very finely chopped. Let cook until the onion is transparent.

At that time we add the okra, previously washed again to remove excess salt and vinegar. Pour over the two glasses of crushed tomato and half a glass of water. We salt and pepper

Shake the pan to distribute the liquid well. Don't put any spoon in because the okra are delicate and could break easily. Cook over medium-low heat for 10 minutes.

We preheat the oven to 200 degrees (390 F). If the casserole where we have made the sauce and the okra are can go in the perfect oven, we put it in and keep it for 30 minutes. Otherwise, we take them to a source that can go into the oven and bake for the same period of time.

They are removed and served like any other vegetable, sprinkling chopped parsley on top. They are really good.


Pain au chocolat, the delicious french pastry

This sweet comes from France, where it is known as "Pain au chocolat" in the north of the country, while in the south it is called "Chocolatine". In Spain it is known as Neapolitan.

If the French recipe is followed strictly, it is one of the most difficult sweets to make. It uses the type of puff pastry that is used for croissants and that is not exactly a puff pastry even if it looks like it. Said paste is complex because it must be made at a certain temperature, which must also be controlled at all times. Easy of course it is not.

On the other hand, it should be noted that it is generally eaten badly, since it is usually eaten when the product is already cold. The right thing is to eat the just made, of course, respecting a few minutes so as not to have to burn ourselves with the heat of the recent cooking. It also does not help to reheat the bun in the microwave or oven. In fact, it is counterproductive because it reduces the quality of the pasta.

Pains au chocolat can be filled with chocolat, pastry cream or applesauce, although there are now also savory versions with ham or cheese.

We are going to make pain au chocolat with chocolat ganache and covered with slivered almonds. We will also prepare croissant dough but in an easier way than the "official" one, with similar results.

INGREDIENTS :

For the croissant dough

  • 400 grams (14 oz) of flour
  • 150 grams (5.3 oz) of butter
  • 250 ml (1 cup and 1/4)  of milk
  • 60 grams (2 oz) of sugar
  • 4 grams (just under a teaspoon) of salt
  • Baker's yeast (16 grams, a bit less than 1 tbsp, one sachet)
  • 1 egg

For the filling

  • 100 grams (3.5 oz) of chocolate in tablet (with sugar)
  • 100 ml (half a cup) of liquid cream for cooking  or for whipping 

For decoration

  • 50 grams (1.8 oz)  of filleted almonds

In the first place we are going to fatten the yeast by dissolving it in the warm milk (a few seconds in the microwave) where we will have also dissolved the 60 grams (2 oz)  of sugar before. Let stand in a warm, dark, draft-free place for 15 minutes.

Mix the salt with the flour (remember, less than a teaspoon of salt and 400 grams / 14 oz of flour).

We mix the dry ingredients with the liquid ones, that is, the mixture of milk and yeast with that of flour and salt. If you have a mixer-kneader, it is time to use it.

Once we have a homogeneous mass, let it rest for 2 hours or until it doubles in volume.

Once the volume has doubled, we divide the dough into 12 equal balls or 6, depending on whether you want large or medium-small pains au chocolat.

Let's imagine that you want them small.

With a rolling pin, flatten the 12 balls until you get more or less a circle of about 15 cm (6 inches)  in diameter and no more than 2 mm (0.08 inches) thick.

We put the butter to the point of ointment and with it we paint the surface of each disk so that they are well covered. We close the disks on themselves to re-form the ball that we had at the beginning.

Wrap each ball in plastic wrap and place in the fridge for 30 minutes so that the butter solidifies.

While the dough cools, we proceed to make the ganache. In a saucepan, pour the cream and heat it, preventing it from boiling. When it is warm, add the chocolat and melt until a homogeneous mass is obtained. Turn off the heat and set aside, letting it cool down.

Once the time has elapsed, we take out the balls again, remove the plastic film and flatten them with the roller until we get a rectangle, again with a thickness of about 2 mm / 0.08 inches.

On each rectangle we deposit a spoonful of ganache, distributing it evenly but leaving a margin of about 5 mm (0.2 inches)  on the edges. Roll up the rectangle until you get a slightly flattened cylinder.

We leave half an hour for the pains au chocolate to rise a bit.

Paint each one with the beaten egg and place a few sliced ​​almonds on top.

We preheat the oven to 200 degrees (390 F).

Bake the pains au chocolat for 10 minutes.

We reduce the temperature to 190 degrees (375 F) and continue baking another 10 minutes.

We extract, let cool (but not completely) and enjoy a pain au chocolate like you have never eaten before.

Some prefer to melt the chocolat that they like the most (with nuts, with orange, white, etc.) in a piece inside the Neapolitan, instead of the ganache. There is no problem doing it this way. In this case, the chocolate is taken, chopped and rolled inside the dough cylinder. The process is practically the same.

Baba de Camello


Hay nombres que francamente parecen ir en contra de la misma receta que titulan. Encontramos el Atascaburras o el Kaiserschmarrn ("la basura del emperador"), precioso calificativo adjudicado por la mismísima emperatriz Sissí a un plato que fue servido a su marido (menudo aspecto que tendría) y cómo no la "Baba de Camelo" portuguesa.

Inventado por casualidad por un ama de casa portuguesa de nombre Valentina a mediados del siglo pasado, no se sabe de dónde le vino la inspiración para nombrarlo. Algunos dicen que por la consistencia de la crema, parecida a la baba que suele colgar de la comisura de los labios de dichos camélidos (precioso también). 

Lo cierto es que se ha vuelto un postre muy popular en nuestro país vecino y en Brasil, aunque en este último se hace de manera diferente. 

Se trata de una mouse realizada con leche condensada a la que se añaden las yemas de huevo. En la receta original se emplea huevo aunque lo recomendado es emplear yemas y claras pasteurizadas para evitar sustos con la salmonela.

Encontrar claras pasteurizadas es muy fácil - las hay en todos los supermercados - pero más difícil es hallar yemas del mismo tipo. Por esa razón he modificado la receta de manera que las yemas se cocinan lo justo para evitar problemas de intoxicación.

INGREDIENTES (4 personas) :

  • 1 pote metálico de leche condensada La lechera o similar, de 370 gramos, nuevo (sin abrir)
  • 4 huevos
  • 100 gramos de almendras laminadas o trituradas (opcional)
  • 1 limón
  • Sal

En primer lugar vamos a meter el pote metálico de la leche condensada (que debe ser nuevo, sin abrir) en una olla con agua hasta cubrirlo. Llevamos el agua a hervor y dejamos alrededor de 2 horas y media. 

Si baja el agua por evaporación la vamos reponiendo. Cuando abráis el pote la leche condensada se habrá convertido en dulce de leche. Si ya disponéis de dulce de leche, saltad este paso. ¿Y si tengo leche condensada pero en un envase no metálico? Lo debéis pasar a una cazuela metálica pequeña que podáis cubrir y la calentáis al baño María durante al menos 3 horas. 

Antes de que finalice el tiempo separáis las claras de las yemas batiendo las segundas.

En cuanto abráis el pote vaciáis el contenido en un bol (cuidado porque estará muy caliente). Tendrá un color marrón típico de la caramelización del azúcar.

En ese mismo instante se vierten las yemas batidas y se mezcla todo con unas varillas o una batidora, hasta que quede bien integrado. Reservamos.

Inmediatamente montamos las claras con un pellizco de sal y unas gotas de limón, hasta que al dar la vuelta al bol donde lo hagamos las claras no caigan.

Integramos las claras en la mezcla de huevos y dulce de leche con cuidado que no se pierda el aire de las mismas.

Llevamos a cada bol de los comensales y directo a la nevera. En unas 2 horas listo para comer.

Antes de servir si se quiere se espolvorea un poco de almendras fileteadas o trituradas. Casi siempre se sirve en una copa como la que se emplea para los helados.

Por cierto, si se llamara "Mala Baba de Camello" tampoco estaría mal adjudicado el nombre. Los camellos, a pesar del aspecto desdeñoso pero calmado que presentan, tienen muy mal genio. Cuando se enfadan con una persona vuelven la cabeza y pegan terribles mordiscos que causan terribles desgarros. En Arabia Saudita no es infrecuente que los cuidadores de los mismos sufran amputaciones en los brazos o heridas que los discapacitan de por vida.


Black rice


Black rice is a typical dish of Spanish Mediterranean cuisine, but it is also present in other European cuisines that share the same coastline. The main difference with spanish paella is the absence of vegetables - except for the sofrito - and of course the black color that the squid ink gives it.

INGREDIENTS (4 diners) :

  • 2 or 3 large squids*
  • Squid ink (can be obtained from the same uncleaned squid)
  • 1 dozen prawns
  • 1 cup of short grain rice (not basmati, not jasmine)
  • 1 ripe tomato
  • 1 large onion
  • 1 clove garlic
  • Fish broth (2 cups and a half, half a liter)
  • Black pepper
  • Salt
  • extra virgin olive oil
* if you do not like squid, other types of fish can be used like hake or cod, for example.

If you buy whole fresh squid, clean it well by removing the skin, remove the cartilage and carefully reserve the ink. If they are already cleaned or frozen squid, you will have to buy the ink separately, either frozen or through your usual fishmonger.

Cut the squid into relatively small pieces. Clean the prawns by trimming the antennae. There are people who put them whole while others prefer to make it easy for the diner by removing the shell and cleaning the intestines. It goes to taste

Incorporate all the fish in a casserole or paella pan with oil and fry for a couple of minutes, just enough for it to take on colour. Remove and reserve.

Finely chop the onion and garlic without the green germ. Add a little salt to make the onion sweat.

When the onion is transparent, add the chopped tomato without skin or seeds and a little black pepper. It is time to add the rice and fry it briefly, so that it is well impregnated with the sauce. Add another little salt. A couple of minutes of working the rice will be more than enough.

We reincorporate only the chopped squid. Prawns are put almost at the end.

Pour the previously heated fish broth and let it cook over high heat for about 5 minutes. Then lower the heat to medium power, letting it cook for about 15-20 minutes. Five minutes before the end of cooking, add the prawns and the bags of ink. Stir well and turn off the heat.

Cover the paella pan with a cotton cloth and let it rest for 5-10 minutes. Ready to serve accompanied by a bowl with alioli or some lemon slices, to taste.

Portokalopita


Este dulce griego se compone de Portokal, que significa naranja y de Pita, que signifia pastel o también "plano". Si la palabra Portokal te suena a Portugal estás en lo correcto. Fue Portugal quien trajo la naranja dulce de la China a Europa y en algunos países, como Grecia, el país que hizo de intermediario dio nombre también al fruto. España también conoció la naranja dulce a través de los portugueses, no de los árabe como se suele creer. 

El mito de que los árabes trajeron la naranja a España no es que sea falso, es que no corresponde al mismo tipo de fruto. Los árabes conocieron la naranja amarga de los persas y estos a su vez de los indios, donde dicha fruta se denominaba "narang" en sáncrito. Los árabes nos trajeron los frutos amargos. Cuando los portugueses importaron a España un fruto muy parecido pero de sabor dulce, la gente simplemente pasó a llamarlas "naranjas" como las amargas. En el siglo XVI los españoles eran muy conscientes de esto y también sabían el origen del fruto, por lo que era normal llamarlas "naranjas de la China". No siempre el origen del fruto está claro en la cultura popular. Mucha gente sigue creyendo que los kiwis proceden de Nueva Zelanda cuando no es en absoluto así, proceden de la China. El fruto fue rebautizado - y en cierto modo apropiado - cuando los neozelandeses lo vieron y les recordó a un ave de la isla, de nombre también "kiwi". La confusión fue aún mayor cuando fue esta nación de Oceanía la que inició la comercialización a nivel mundial del fruto. Todavía es normal que la gente hable de "Kiwis de Nueva Zelanda" cuando en realidad tienen un origen muy distinto.

Por cierto, las naranjas se siguen cultivando en la China pero su precio en origen es muy elevado. De hecho muchos chinos no las prueban hasta que viajan por el Mundo y la pueden adquirir a un precio más que económico.

La portokalopita es un pastel que se realiza con pasta filo, yogur, naranjas (por supuesto) y almíbar.

INGREDIENTES 

  • 400 gramos de yogur griego
  • 1 paquete de pasta filo (necesitamos al menos 8 capas o 250 gramos)
  • 100 gramos de azúcar
  • 100 gramos de aceite de oliva
  • 3 huevos
  • 1 naranja grande + 1 naranja para decorar (opcional)
  • 1 sobre (20 gramos) de levadura química (tipo Royal)

Para el almíbar

  • 1 vaso (200 ml) de agua
  • Medio vaso (100 ml) de azúcar
  • 1 naranja

Primero vamos a hacer el almíbar.

Rallamos la piel de la naranja y luego la exprimimos. Reservamos la ralladura y el zumo.

Vertemos el agua y el azúcar en una cazuela a fuego medio, removemos constantemente hasta que espesa. En ese momento añadimos el zumo y la ralladura de la piel. Reservamos.

Batimos los huevos con el azúcar. A la crema resultante le añadimos el aceite y el yogur. Mezclamos bien hasta obtener una masa homogénea.

Obtenemos también la ralladura de una naranja y su zumo. Lo agregamos a la mezcla de yogur y también añadimos la levadura química.

Cortamos el paquete de pasta filo y lo cortamos en tiras de 1 cm de anchura, más o menos. Es como si hiciéramos papardelle (pasta ancha italiana) por poner un ejemplo.

En cuanto la cortamos llevamos a un bol (rápido porque se seca enseguida) y vertemos la mezcla de yogur con naranja y huevos. Mezclamos bien que las tiras de pasta filo queden bien impregnadas.

Vertemos todo esto en una fuente que pueda ir al horno, no muy alta, e introducimos en el mismo a 180 grados durante 45 minutos.

Si queréis decorarlo con láminas de naranja, cortamos una muy fina sin quitar la piel. A media cocción se colocan sobre el pastel.

Una vez horneado, extraemos y en caliente vertemos el almíbar por encima. No lo desmoldéis.

Dejáis enfriar a temperatura ambiente y entonces lo lleváis al frigorífico, para que el almíbar se empape bien.

Se extrae al día siguiente, se desmolda o corta de la fuente,  tomándose frío o bien del tiempo.

El sabor a naranja que tiene es increíble, siendo un postre perfecto para terminar una comida con categoría.

Sobaos, the spanish butter muffins


One of the most representative sweets of Cantabrian confectionery (northern Spain) and a true delight for the palate. They have a certain resemblance to muffins but with a more pronounced butter flavor.

They are cooked with very few ingredients and at a more than affordable price. And as if that were not enough, the ingredients are easy to remember since it only uses 4.

Any amount can be made since you just have to keep in mind that sugar, butter and flour have to have the same weight. The eggs are increasing proportionally.

INGREDIENTS :

  • 100 grams (3.5 oz)  of butter
  • 100 grams (3.5 oz) of sugar
  • 100 grams (3.5 oz)  of flour
  • 2 eggs

First, beat the butter to the point of ointment with the sugar until you get a creamy dough. Without stopping beating we add the eggs.

Next, add the sifted flour -so that it does not form lumps- and beat well until you get a creamy dough.

We preheat the oven to 180 degrees (356 F). Let's pour the dough into a preferably square source that can go in the oven. It can be a disposable aluminum or silicone source. We must leave a depth of about a finger and a half.

Bake for 30 minutes or until the surface is toasted and a toothpick inserted comes out dry. As we do not have yeast, you can open the oven without any problem to check the cooking.

Let cool and cut into squares, ready to be consumed

Arroz Caldero de Murcia


El Arroz Caldero es una de las recetas más populares y apreciadas de la gastronomía murciana. Originaria de la zona del Mar Menor, actualmente se sirve prácticamente en toda la comunidad habiéndose extendido también a la vecina provincia de Alicante donde igualmente se considera un plato casi propio. 

En muchos restaurantes los pescados humildes que se empleaban cuando la receta se creó han sido sustituidos por otros de mayor precio - lubina, dorada - e incluso se le han añadido gambas y otros mariscos, convirtiéndolo es un plato de precio pero alejado de lo que era en un principio. Os voy a dar a continuación la receta tradicional, servida como antiguamente se hacía, en dos vuelcos. 

En el primer vuelco se sirve el arroz y en el segundo los pescados empleados en la confección del caldo. En la actualidad se tiende a unir ambos, por aquello de que el pescado utilizado es de mayor precio, pero lo que nunca falta es servir el arroz con alioli sin el cual este arroz estaría falto de algo.

El nombre de este arroz procede del caldero donde se solía realizar.

INGREDIENTES  (4 personas)

  • 2 vasos de arroz tipo bomba (u otro tipo de arroz de grano corto)
  • 1. 5 Kg de pescado variado (mújol, gallineta etc)
  • 2 vasos de tomate triturado
  • 4 ñoras
  • 4 dientes de ajo
  • Perejil
  • Sal
  • Azafrán (unas hebras)
  • Pimienta negra molida
  • Aceite virgen extra de oliva

Para el alioli

  • 4 dientes de ajo
  • 1 vaso y medio de aceite virgen  extra
  • Sal

En primer lugar vamos a freír las ñoras, sin semillas, en una cazuela ancha y honda (a menos que tengáis caldero, en cuyo caso, empleadlo) con un chorro abundante de aceite de oliva.

Cuando las ñoras estén fritas, las llevamos a un mortero junto a los 4 dientes de ajos sin el germen verde. Lo majamos todo hasta obtener una especie de pasta. 

En la misma cazuela donde hemos frito las ñoras, vertemos el tomate triturado. Cuando el tomate está frito, añadimos 2 litros de agua y la picada que hemos hecho de ñoras y ajos. Dejamos hacer hasta que el agua hierve.

Mientras el agua hierve, limpiamos los pescados y retiramos entrañas y cabeza. En el momento en que hierve el agua añadimos todos los pescados, cortados en rodajas gruesas, junto a unas hebras de azafrán y media cucharadita de pimienta negra molida. Reducimos el fuego y sazonamos.

Cuando todos los pescados están cocidos - no llevará más de 15 minutos, no deben quedar deshechos, los retiramos y reservando intentando que no se enfríen.

Subimos el fuego y añadimos el arroz, dejándolo a fuego fuerte durante 5 minutos y luego bajándolo a fuego medio durante otros 15 minutos. Rectificamos de sal y ya estará hecho.

Para hacer el alioli simplemente pelamos los dientes de ajo, les quitamos el germen verde y llevamos a un mortero donde los majamos hasta que formen una especie de pasta. Añadimos un pellizco de sal y el aceite poco a poco, ligándolo a la vez. Si vemos que se nos corta podemos añadir una cucharadita de mahonesa. Hay que hacer bastante alioli, así que paciencia.

El arroz se sirve primero, siempre caldoso,  con una salsera con alioli - algunos ya ponen una cucharada encima directamente -  y luego en una fuente el pescado, que se sazona también con alioli (a veces se rebaja con un poco del caldo de cocción). 

Está para chuparse los dedos.

Frittata di Spaghetti


In Naples, the fritatta di spaghetti is a very popular dish, used as a way to recycle leftover spaghetti, although it is also common to cook pasta specifically to prepare this dish. In short, it would be an omelette where the "filling" is spaghetti instead of the typical potatoes that are used, for example, in Spanish omelette.

INGREDIENTS (4 people)

  • 250 grams (9 oz)  of spaghetti
  • 5 eggs
  • 100 grams (3.5 oz) of cheese *
  • 50 grams (1.8 oz) of grated Parmesan cheese
  • 50 grams (1.8 oz) of diced bacon (better smoked)
  • 2 tablespoons chopped parsley
  • Salt
  • Pepper
  • extra virgin olive oil

* the typical cheese used in the fritatta is scamorza. As it is not a very easy cheese to find outside of Italy, you can use some smoked cheese, provolone or even some that melt like emmental, gouda, etc.

First, cook the spaghetti with plenty of water (1 liter / 5 cups per 100 grams / 3.5 oz), salt and a little oil until al dente (see the manufacturer's instructions). If you have leftover pasta from past days  you can use it, of course.

In a bowl, beat the eggs and add the bacon, the scamorza cheese (or whatever type you have) cut into squares, the chopped parsley, salt and pepper, as well as the Parmesan. What's the point of adding parmesan to scamorza? It is a matter of price. Parmesan is very expensive and making the whole omelette with just Parmesan would be very expensive. The scamorza therefore helps to make the recipe cheaper. This mixture of Parmesan with other cheeses is common in Italian cuisine, largely for economic reasons. In many recipes, if it weren't outrageously expensive, 100% of the cheese used would be Parmesan.

Mix the ingredients well and reserve. Drain the cooked spaghetti and place them in a large non-stick pan with a splash of oil, distributing them evenly over the entire surface. Let them fry, without stirring or touching them, for about two or three minutes (they should be slightly golden). 

Next, pour the cheese and egg mixture over it, reducing the heat to medium-low and covering the pan. It is important that we distribute the egg evenly because, unlike other tortillas, it is not convenient - indeed it should not be done - to stir the ingredients with a spoon or similar. What you should do is move the pan in slow circular movements to make sure it doesn't stick and the egg is curdling. 

When we see that the omelette detaches from the surface, we turn it over with the help of a plate or a lid and let the other side cook for about five minutes (or until it is done).

It is served piping hot and can be, accompanied by a salad, a single dish menu. 

By the way, Italians often laugh at Neapolitan fritattas as "lesser" gastronomy. I can already tell you that the fritatta is certainly not minor and that I would not laugh at anything that came out of Naples, the place of origin, among other things, of pasta, pizza and Neapolitan coffee, nothing more and nothing less.

Filete Chateaubriand con Salsa Bearnesa

El filete Chateaubriand es una creación francesa que se suele cocinar bastante mal. La idea es emplear la parte alta del lomo (mejor buey que ternera) que es la más ancha. Se cocina brevemente para dorar el exterior dejando el interior de color rosa. Se sirve con salsa chateaubriand, que es propia de la receta o bien, que es lo que hacen todos los restaurantes en la actualidad, se le añade salsa bearnesa. Como acompañamiento he visto desde patatas fritas hasta patatas duquesa.

El corte que se sirve al comensal es grueso de hasta 3 ó 4 cm.

En las recetas que he visto hay varias cosas que se hacen mal :

  1. Lo hacen al horno : ni hablar, siempre al grill, parrilla, sartén o similar.
  2. No se ata el trozo de lomo : se debe atar SIEMPRE para que se haga por igual por todos lados.
  3. No se monitoriza la cocción : debemos de poder mirar algún lado para que no perdamos el color rosado que lo caracteriza. Luego explico cómo se hace esto.
El nombre probablemente proceda del diplomático y escritor francés de mismo nombre aunque, como es lógico, sería una creación de su cocinero que por desgracia no ha pasado a la posteridad.

INGREDIENTES (4 personas) 

Para la carne

  • Lomo alto de buey (o ternera, si no hay de lo primero), unos 800 gramos
  • Sal
  • Mantequilla sin sal
  • Hilo para atar
  • 2 filetes de buey (ahora explico la razón)

Para la salsa bearnesa (que haremos al microondas) 

  • 50 ml de mantequilla sin sal (un cuarto de vaso)
  • 2 yemas de huevo
  • 2 cucharadas de nata para cocinar *
  • 1 cucharada de vinagre de vino blanco
  • 1 cucharadita y media de zumo de limón *
  • 1 cucharadita de estragón seco
  • 1 cucharadita de perejil fresco picado *
  • 1 cucharadita de cebolla rallada
  • Un cuarto de cucharadita de sal (algo más de 1 gramo)
  • 1 pizca de mostaza fuerte, tipo francés *
  • 1 pizca de pimienta de cayena *

estos ingredientes son opcionales. Si prescindís de los mismos la salsa sigue siendo bearnesa pero por la forma de realización se podría notar algo que no se ha hecho de la forma tradicional. La adición de zumo de limón aumenta la acidez, la mostaza y la cayena realzan el sabor a nivel nasal y la nata aumenta la amplitud de los sabores grasos de la mantequilla.

Extraemos la carne del frigorífico al menos 2 horas antes de cocinarla, en un lugar fresco pero a temperatura ambiente. Cubrimos la pieza con sal gruesa (mejor escamas de sal tipo Maldon) y dejamos reposar. Si hace mucho calor es mejor dejarla en el interior del frigorífico pero en la parte alta, la menos fría.

Vamos a realizar en primer lugar la bearnesa. Así cuando la carne esté hecha podremos servirla de inmediato.

En primer lugar colocamos la mantequilla en un bol y la fundimos en el microondas a máxima potencia (30 segundos será tiempo más que suficiente).

Sacamos el bol e incorporamos todos los ingredientes. Batimos bien con las varillas.

Regresamos el bol al microondas y cocinamos durante 90 segundos a máxima potencia (750-850 W) parando cada 30 segundos para batir bien. Si no se bate 3 veces antes de finalizar los 90 segundos el resultado es malo no a nivel de sabor sino visual (el huevo no emulsiona con la mantequilla). Durante las paradas batid bien pero rápido ya que la salsa debe mantenerse a la misma temperatura durante todo el proceso. Reservamos manteniendo caliente.

Ahora vamos a hacer la carne.

Retiramos toda la sal de la superficie de la carne (esto es, la que no haya absorbido la carne)

Cortamos la punta del extremo del lomo (el otro extremo será plano, logicamente).

Colocamos en ambos extremos los dos filetes de buey.

Atamos la carne de manera que forme un paquete rectangular, aprisionando con el hilo los dos filetes que hemos añadido en los extremos.

Vertemos en una sartén grande un par de cucharada de mantequilla que fundimos a fuego medio-fuerte.

Doramos la carne por cada lado y, atención a esto, al darle la vuelta no la pinchamos, lo hacemos con ayuda de unas cucharas de madera o unas pinzas. Separando un poco los filetes "añadidos" controlaremos que la carne del centro continua rosada. En principio deberíamos dorar todos los lados del rectángulo aproximadamente 10 minutos cada uno, como ya he dicho vigilando que no se pierda el rosado.

Cuando los lados están dorados, se retira del fuego dejando que repose 10 minutos evitando que se enfríe. Así los jugos de la carne quedan bien distribuidos.

Cortamos el hilo y desechamos los filetes de buey añadidos.

Con un cuchillo afilado hacemos 4 porciones (en efecto, 200 gramos de carne por comensal) y servimos de inmediato, cubriendo parcialmente con salsa bearnesa o añadiendo un pequeño bol con la misma para que el comensal se sirva a su gusto.

Una receta realmente impresionante para grandes celebraciones.


Kichererbsen nach katalanischer Art

Dies ist eines dieser Rezepte, die verloren gegangen sind und nur zu Hause gemacht werden (und auch nicht zu viel). Es ist eine Schande, denn wenn gekochte Kichererbsen verfügbar sind, ist es so einfach zuzubereiten, dass es länger dauert, den Beitrag zu lesen, als

ZUTATEN (4 Personen)

  • 800 Gramm gekochte Kichererbsen
  • 2 Eier
  • 1 große rote Zwiebel (süß)
  • 4 zarter Knoblauch
  • Ein halbes Glas zerkleinerte Tomaten
  • 1 Glas Weißwein
  • Ein halbes Glas Wasser oder Gemüsebrühe
  • Salz
  • Natives Olivenöl extra
  • 2 Scheiben Brot (das typische Baguette oder Bauernbrot)
  • 1 Dutzend geröstete Mandeln
  • 1 Dutzend geröstete Haselnüsse
  • 1 Knoblauchzehe
  • 1 Zweig Petersilie (nur die Blätter)
  • Salz
  • Natives Olivenöl extra

Wir braten das Brot in einer Pfanne mit Öl und wenn es goldbraun ist, bringen wir es in einen Mörser.

Fügen Sie die Knoblauchzehe ohne Keime, die Mandeln und die Haselnüsse, die Blätter des Petersilienzweigs, etwas Salz und einen Esslöffel natives Olivenöl extra hinzu.

Wir pürieren gut, bis wir eine Paste bekommen. Wir gebucht.

Zweitens kochen wir die Eier so, dass sie hart sind (12 Minuten, nachdem das Wasser zu kochen beginnt). Denken Sie daran, dass die Eier mit kaltem Wasser mit einem Spritzer Essig und einem Esslöffel Salz gekocht werden (Salz wird verwendet, um das Schälen zu erleichtern).

Nach dem Kochen herausnehmen, unter kaltes Leitungswasser laufen lassen und schälen. Dann hacken wir sehr fein. Wir gebucht.

In einer Pfanne mit einem Schuss Olivenöl die Zwiebel und den fein gehackten Frühlingsknoblauch anbraten. Kochen lassen, bis die Zwiebel durchsichtig ist. Zu diesem Zeitpunkt fügen wir die zerdrückte Tomate hinzu.

Fügen wir die Kichererbsen hinzu, rühren mit dem Tomate um und fügen dann das Glas Wein hinzu.

Lassen Sie es einige Minuten kochen, damit der Alkohol verdunstet. Gießen Sie es dann Paste (brot, mandel..) über das Kichererbsen. Gut umrühren und etwa 5 Minuten kochen lassen. Mit Salz abschmecken und kurz vor dem Ausschalten die gehackten Eier darüber streuen. Es gibt Leute, die sie gerne unter den Rest mischen und andere, die es oben drauf lassen, als wäre es ein "Topping", es kommt auf den Geschmack an.

Wenn Sie sehen, dass es sehr trocken ist, dass der Wein zu stark verdunstet ist, fügen Sie Gemüsebrühe oder etwas Wasser hinzu. Es gibt Leute, die sie in Brühe essen, andere, die sie lieber trocken mögen. Nicht selten werden auch Wurst, Speck oder sogar Kabeljau darauf gelegt. In diesem Fall haben wir uns für die traditionelle Variante entschieden.

Sie werden sehen, wenn Sie es versuchen, warum es schade ist, dass dieses Rezept verloren geht.

Bakalarios Skordalia, the greek Fish and Chips with a mediterranean touch

Skordalia is a compound word of skordos (garlic in Greek) and agliata (also garlic, but in Italian). That is, it is a redundant word that translated into English would sound like "garlic garlic." It is what is called pleonasm, admitted in Greece because it is formed with a foreign word and does not seem like a stupid repetition.

Skordalia consists of a mixture or soft emulsion of garlic with mashed potatoes or bread with olive oil, although I also know that it is made with nuts (which I have never tried). In some cases, egg is added as an emulsifying agent, but in this case it is more similar to garlic mayonnaise than to authentic skordalia.

There are many ways to make this cream but the Greeks usually do it by hand and using a mortar.

The dish consists of portions of cod (it can be fresh or desalted) coated in batter and served with the skordalia, which is dipped or pinched a little before taking it to the mouth, depending on whether you make it more or less liquid.

It is a very typical Greek mezze dish.

INGREDIENTS (4 people)

for the cod

  • 600 grams (1.3 lbs) of salted cod, preferably from the loin, with few bones
  • Wheat flour
  • Olive oil for frying (can also be fried in sunflower or corn oil)

For the batter

  • 1 cup (200 ml) white wheat flour
  • 1 cup of sparkling mineral water
  • The juice of half a lemon
  • 2 tablespoons cornstarch
  • 1 teaspoon of baking powder
  • 1 teaspoon salt*
  • Black pepper

* Be careful with the salt that is used since the cod, although desalted, still has enough. If the strong salty taste bothers you, use only half a teaspoon.

For the Skordalia

  • 400 grams (14 oz) of potatoes
  • 4/6 cloves of garlic
  • Half a cup (100 ml) of extra virgin olive oil
  • 1 teaspoon salt
  • 2 tablespoons lemon juice


We put the cod to soak (if it is salted) in abundant water. Do it during 24 hours, changing water twice.

First we are going to boil the potatoes without skin and whole. When they are soft, we put them to drain the excess water.

While we are going to incorporate the garlic cloves (without the green germ), the oil and the teaspoon of salt in a mortar and we will start to mash them until we get a homogeneous paste (if we like it a lot, but a lot, the garlic taste we will use 6 cloves, otherwise 4).

Then we pass the potatoes through the potato masher and slowly incorporate the mixture obtained in the mortar. Mix well with the help of a spoon adding the lemon juice. We try to rectify salt and lemon and it's ready. It will depend on whether we want it more liquid or dry that we add a little more oil and lemon juice or leave it as is. We booked.

Now we are going to fry the cod.

Remove from soaking and drain well.

After draining the fish, we coat it in white flour.

We prepare the batter by mixing all the ingredients that we have indicated. Cover the pieces of cod with this sauce.

Pour a generous stream of oil into the pan and over medium heat, coat the fish until it is well browned.

It is served alongside the skordiala immediately. And you can be sure that you will repeat this dish more than once.

The skordalia is also used for many things. It is a good accompaniment to other fish, meat and even vegetables. If you like, you can use it in many other recipes.