SÁBADO
DESAYUNO

Pastel polaco de queso con café con leche

Recetas tradicionales cocinadas en media hora o menos

Greeks are very fond of eating grilled meat. This usually comes from lamb or pork and to a lesser extent from cow or veal. Almost all of us are familiar with souvlakia, probably the most well-known Greek-style meat skewer by tourists.
Despite their fondness for these preparations, the Greeks do not usually cook meat on the grill at home for reasons of comfort. To taste grilled food - fish, meat or vegetables - they usually always choose the so-called taverns where they are masters in making these recipes prepared on charcoal or wood grills.
Unlike the French, in Greece meat is always eaten well done. So in the grill the meat is left until it is well marked, almost burned. The Greeks feel very upset, to the point of stopping eating the meat, if they see blood or the center is just pink.
The so-called "bifteki" are hamburgers that are usually filled - not always - with cheese. In fact, I have eaten them with the same name on the island of Rhodes and they did not have any cheese inside.
The most perceptive will have realized that "bifteki" sounds like "bistec" or "bife" (in Argentina, Chile and Uruguay), a word that in turn comes from the English "beefsteak". Therefore, the term that for a Latin or American means steak or cut of meat, for a Greek it is a hamburger.
It is from Greece, not to mention the Middle East, that the typical cuts of meat in the West practically disappear. We will no longer find steaks with potatoes, filet mignon or ossobucos on restaurant menus.
In Arab countries the reason is crystal clear: the cattle are slaughtered removing as much blood as possible and if we tasted the meat with the usual cuts of the West, we would "miss" the taste of blood (that's how vampires we are).
In Greece and other former Ottoman rule but non-Muslim countries, there are several reasons for the absence of "real" steak. On the one hand, cattle are quite scarce and cows are eaten, not veal, so the hardness is always greater. On the other hand, the aforementioned Ottoman influence. And finally because the population has become accustomed to eating tender pieces that are easy to chew; If you hand a Greek a somewhat tough steak, he'll probably go to great lengths to swallow every bit.
The bifteki is prepared with a mixture of lamb and beef that is kneaded with eggs and spices to make a hamburger in the center of which is placed a slice of cheese. The most common is Kefalograviera, the same one used for saganaki. Unfortunately it is difficult to find, so we can use feta.
INGREDIENTS :
Mix the two types of meat with the egg, the grated onion, the spices and season with salt and pepper (a teaspoon of salt and a half of black pepper). If the dough is too fluid, add breadcrumbs. Once we have a very homogeneous dough, we make balls the size of a tennis ball. Place them on a baking paper and flatten them until they are very thin. In the center we place the cheese sheet and close so that the edges are well sealed. This will prevent the cheese from escaping when placing them on the fire.
As I have already said, bifteki are made on the grill, grill or barbecue, whatever you have at your disposal. You paint them with olive oil and direct them to the fire.
For the hamburger to be done well inside and out, the meat must be well marked. If it gets too black and that bothers you, it is best to finish it in a hot oven (200 degrees / 390 F, 15 minutes).
The grace of this recipe is to eat the meat and that the semi-melted cheese fills our mouths. I usually eat them in an unorthodox way that I recommend: taking them by hand and dipping them in tsatsiki.

Esta es una de las tartas más famosas de los Estados Unidos porque tiene un sabor impactante y por lo fácil que es de hacer ya que en principio no necesita horneado. Eso sí, tiene un problema, y es que emplea en la masa huevos sin cocinar y por tanto es susceptible de ser un foco de salmonela. Para evitarlo se pueden emplear yemas pasteurizadas o bien realizar una pasteurización casera del huevo para lo cual vais a necesitar de un termómetro de cocina.
INGREDIENTES :
Para la base
Para el relleno
Para el "topping" (opcional)
En primer lugar vamos a realizar la base. Para ello es recomendable disponer de un molde con la base removible y por supuesto, aunque es lo habitual, metálico.
Mezclamos las galletas trituradas con la mantequilla al punto de pomada (blanda, pero no líquida) y el azúcar. Removemos bien hasta formar una pasta.
Repartimos la masa obtenida por la base del molde (apretando bien con la ayuda de una cuchara) y subimos parte la misma por la paredes para dotar de borde a la tarta. Introducimos en el frigorífico.
Para hacer el relleno, si disponemos de yemas de huevo pasteurizadas, simplemente las mezclamos con la leche condensada y el zumo de lima, batiendo bien.
En caso contrario, separamos las claras de las yemas y mezclamos bien las segundas con la leche condensada y el zumo de lima. Llevamos a una cazuela y a fuego muy bajo, sin dejar de remover, mantenemos durante unos 3 minutos a 80 grados de temperatura (hay que monitorizar con un termómetro, no queda otra). No puede ser menos, porque no sería efectivo, ni tampoco más o se perdería el sabor intrínseco de la tarta.
Vertemos el relleno sobre la base de galletas trituradas y llevamos de nuevo al frigorífico unas 8 horas (una noche).
Antes de servir la tarta, batimos la nata con el azúcar hasta que queda montada. Se coloca en una manga pastelera y se dibuja una cenefa o bien se distribuye por toda la superficie.
Para chuparse los dedos, de verdad.

The zeppole are typical sweets from Naples. Are consumed generally for San Giuseppe (March 19) although in the actuality can be found on any date and in all Italian patisseries.
Although they are usually given doughnut-shaped is also common, especially when made at home, give them elongated shapes as if they were cannoli, the Sicilian sweets par excellence or, as if they were fritters.
It is a very simple recipe that I recommend strongly. They are worth it.
INGREDIENTS :
* If you want to use normal (granulated) sugar is also ok.
In a large pot pour the water and the wine. Heat over medium heat until it begins to boil. We must not allow bubbling boil, this is important.
When this happens, add all the flour at once and ttir constantly with a wooden spoon. After a while a ball will form around the spoon.
Take out this ball and place on a flat surface.
Knead with a rolling pin until it becomes fine and smooth (at least we need to knead for half an hour).
Now we are going to take the dough and roll it up until we get a kind of elongated snake with the width of a finger.
We cut sections of 8 centimeters (3 inches) and join them by the ends to form donuts.
Fill up a deep frying pan with plenty of oil at medium heat and when it starts to almost smoke we fry the zeppole. Slide them gently into the hot oil, holding by the joint of the ring.
They will fry with with a lot of bubbling. Only a few at a time, since they should float freely and without touching.
With a long toothpick or similar you must carefully puncture the zeppole so that the dough comes out. This way they are much crispier and golden.
When they have taken a good golden color we take them out to deposit on absorbent paper. Let them cool a bit.
The finishing touch consists of making a mixture with cinnamon and icing sugar. The zeppoles are passed through it and they are ready to be consumed, cold or hot, to the taste of the consumer.
Easy and really yummy.

Los calamares son muy populares en Grecia, comiéndose al igual que en España de múltiple maneras : rellenos, en estofados de pescado, fritos etc.
Los Kalamarakia Tiganita serían el equivalente de los calamares rebozados a la manera andaluza pero empleando otro método para rebozarlos. Quedan muy crujientes y sabrosos, además de ser muy fáciles de hacer.
INGREDIENTES (4 personas)


La Pastiera es un pastel muy típico de Nápoles que se suele degustar en Semana Santa. Se compone de una base de pasta quebrada, la que no sube (frolla en italiano) que se rellena con una crema de queso ricotta y otra de semola fina lo que le confiere una textura granulosa. La tarta se remata con un enrejado romboidal realizado igualmente con masa quebrada.
Las características más diferenciadoras de esta tarta de queso es el empleo de muchos cítricos como saborizantes y la cocción lenta. De hecho la pasta que emplea no es exactamente quebrada, si no una que emplea aroma de azahar. No obstante, con objeto de simplificar la receta, emplearemos masa quebrada convencional.
INGREDIENTES
Para la crema de ricotta
Para la crema de sémola
Lo primero que debemos hacer es dejar la ricotta escurriendo en un colador para que esté lo más seca posible, apretándola incluso si fuera necesario. Cuanto menos agua tenga mejor.
Cortamos la fruta confitada muy pequeña, a ser posible que predomine en la piel la cáscara de naranja.
En un bol mezclamos la ricotta con el azúcar, la fruta confitada, los huevos, el agua de azahar y la canela en polvo. Si tenemos unas varillas eléctricas para mezclar es el momento de emplearlas. Debe quedar una masa suave y homogénea. Reservamos.
En una cazuela a fuego medio incorporamos la leche, la sémola fina, la cáscada entera de un limón y una naranja sin la parta blanca que amargaría y la mantequilla. Dejamos hacer hasta que el grano se hincha lo que viene a ser entre 25 y 30 minutos. Quedará con la consistencia de unas gachas o unas papillas espesas. Retiramos las cáscaras de las frutas y dejamos enfriar un poco.
A continuación mezclamos la crema de trigo con la de ricotta hasta que quede una masa homogénea. Reservamos.
Extendemos la pasta quebrada en un molde de unos 22 cm no muy alto previamente engrasado con mantequilla.
Pinchamos con un tenedor la base de manera que no suba demasiado.
Vertemos la mezcla sobre la pasta quebrada y extendemos.
Cortamos tiras de unos 2 cm de ancho y unos 22 cm de largo para formar un enrejado romboidal sobre el pastel.
Precalentamos el horno a 150 grados e introducimos el pastel. Dejamos hacer durante unas dos horas. A partir de los 90 minutos comprobaremos si el pastel está hecho clavando un palillo en el centro. Si al extraerlo sale seco, está listo.
Cuando esté listo apagamos el horno pero dejamos dentro durante media hora con la puerta del horno entreabierta (colocando una cuchara de madera o similar).
Sacamos del horno y dejamos enfriar. No se guarda nunca en la nevera pero aguanta bastante bien durante al menos 48 horas, siempre y cuando no haga mucho calor.
El aroma que desprende durante el horneado ya alimenta de por si. Imaginad al darle el primer bocado.

A maneira de fazer esta limonada é um pouco estranha, pois é usada toda a lima, incluindo a casca. Em qualquer caso, vale a pena fazê-lo, pois o resultado é muito impressionante. Esteja ciente de que esta bebida é feita com limas, não com limões.

Well, the ciabatta that you find in the bakery had a creator named Arnaldo Cavallari, who died in 2016. He must have been an interesting guy to say the least since he was a rally driver (Italian champion four times) and later, converted into a baker, designed this type of bread based on a ferment called biga.
Ciabatta bread has a thick, crispy crust and a fluffy crumb resulting from its high hydration. It is perfect for making sandwiches.
INGREDIENTS :
To prepare the biga:
To make the bread dough:
To make the biga, first heat the water so that it is lukewarm and dissolve the yeast and sugar in it. Let stand for about 10 minutes in a dark place without drafts.
In a large bowl, pour the previously sifted flour and then add the water with the yeast and the sugar that we have previously mixed. We mix well and then let the dough obtained rest in a warm place, without much light and without drafts with a cloth that covers it. We leave it like this until it doubles in volume.
When the biga has doubled in volume, we add the ingredients that were indicated in the previous list to make the bread dough. First the warm water, then the sifted flour little by little, the oil, the remaining yeast and knead with oil-smeared hands, obtaining a homogeneous dough. Work the dough well for 10 minutes and halfway through kneading add the salt.
We flatten the dough and we can do several things: form a single rectangle to obtain a single loaf or cut individual loaves (two, as I have done) or several small ones.
Once the dough is divided, let it rise for half an hour.
Preheat the oven to 180 degrees (356 F) and place the loaves on baking paper, sprinkle flour on top and bake for about 20 minutes (or until golden brown).
Let cool and ready to eat. It is one of the best Italian breads that can be tasted.

En Alemania se escriben Wibele pero al pronunciarlas a los españoles nos suena a "Vibele". El nombre procede del apellido Wibel, el pastelero creador de la receta.
Esta receta procede de la región llamada Franconia que en la actualidad está repartida entre varios estados federales aunque la mayor parte se encuentra en Baviera. La ciudad más importante de Franconia es Nuremberg. En la actualidad las Wibele se consideran una receta de la gastronomía suaba. De hecho se conoce popularmente como Schwäbische Wibele (wibele suabos).
Este pequeño merengue duro es de apenas unos 2 cm de longitud con una forma de "ocho" muy característica y distintiva.
Necesitan muy pocos ingredientes y son fáciles de hacer.
INGREDIENTES :
En primer lugar batimos las claras con unas gotas de zumo de limón y un pellizco de sal hasta que quedan montadas. Han de quedar muy firmes, de manera que al dar la vuelta al bol las claras queden pegadas al mismo y no caigan.
Tamizamos el azúcar, la harina y el azúcar vainillado, mezclandolas en un bol. Añadimos entonces las claras montadas y batimos bien para obtener una masa homogénea.
Llenamos con la masa resultante una manga pastelera, boquilla pequeña, y a continuación sobre un papel sulfurado (o papel de hornear) depositamos una pequeña bolita de masa.
A continuación, justo al lado de la anterior, depositamos otras bolita del mismo tamaño que se adherirá por cercanía a la primera. Esto formará la típica forma de ocho de estas galletas. Terminamos la masa contenida en la manga pastelera y dejamos reposar toda la noche para que endurezca (8 horas).
Recordad que la longitud máxima es de unos 2cm. A las 8 horas precalentamos el horno a 180 grados y colocando las galletas en la parte central del horno las dejamos unos 6 minutos.
Se toman frías y son una delicia, lo mejor para acompañar el té o el café.

Le rose di pasta sfoglia sono un dolce tipico di Alcalá de Henares, la città vicino a Madrid dove nacque Miguel de Cervantes, creatore del Quidjote. Ho detto "dolce" anche se in realtà si possono fare delle roselline salate con prosciutto o formaggio. Anche se guardando la fotografia può sembrare complicato ottenere la forma, la verità è che è molto semplice da fare.
Faremo delle rose con la marmellata di pesche e altre con la nutella, anche se possono essere fatte con fettine di mela, burro, ecc. Quelli salati sono ancora più facili da fare, potendo utilizzare, come abbiamo detto prima, prosciutto, formaggio, salami, tra molti altri. Il limite è l'immaginazione che metti alla cucina.
INGREDIENTI
Se la pasta sfoglia è congelata, scongelatela in frigorifero, mai fuori. In caso contrario, toglietela dal frigo circa 15 minuti prima di iniziare la preparazione.
Stendere la teglia su carta da forno (generalmente la confezione che avete acquistato l'ha già incorporata).
Tagliamo strisce longitudinali lunghe circa 20 cm e larghe circa 6 cm. Sono le strisce che arrotoliamo per fare le rose.
Mettere nel microonde la nutella e la marmellata, la prima mescolata con un cucchiaio di latte e la seconda con un cucchiaio di acqua. Diamo circa 15 secondi e mescoliamo bene. In questo modo possiamo dipingere meglio le sfoglie di pasta sfoglia.
Della larghezza della striscia (6 cm) ne dipingiamo solo la metà (3 cm), alcuni con la nutella e altri con la marmellata. Non è necessario renderlo molto sottile, meglio spesso.
Raddoppiamo la larghezza della striscia su se stessa. Cioè quando lo pieghi, ci sarà una striscia di lunghezza pari a quella che era (20 cm) ma con una larghezza di soli 3 cm.
Con la parte aperta della piega verso l'alto (ovvero dove si vede il ripieno) fare una spirale libera con la striscia di pasta sfoglia. Puoi posizionare le spirali in grandi carte da stampo per cupcake anche se non è del tutto necessario.
Dai alla spirale una certa forma di petali di rosa anche se non preoccuparti, quando sarà cotta sarà in una forma migliore.
Se vuoi, puoi dipingere l'esterno con tuorlo d'uovo per renderlo più luminoso, anche se non è necessario. Disporre le rose su carta da forno.
Preriscaldiamo il forno a 190 gradi e cuociamo le roselline per circa 20 minuti (guardate il foglietto illustrativo della pasta sfoglia per vedere che indicazione mostra il produttore, a volte è di più ea volte di meno).
Quando la pasta sfoglia è gonfia e ben rosolata, si può togliere.
Fate raffreddare e spolverizzate sopra lo zucchero a velo.
Se vuoi renderli salati, sostituisci la marmellata e la nutella con qualsiasi ingrediente salato che desideri.
Salate o dolci, queste rose di Alcalá sono una delizia per il palato.

The Camino de Santiago leads to the city in the north of Spain with the homonymous name, where the remains of the Apostle rest. If you have been there, done the route or just visited Galicia (the region of northwestern Spain with a language similar to Portuguese) you probably already know this impressive cake.
The Santiago cake probably has its origin in the Middle Ages. In spite of that, what can be verified through documents is that the date of birth of the Santiago cake is 1577 due to the references of a document on the nutrition of the teaching staff at the University of Santiago de Compostela, although it is not until the 19th century in that the recipe takes the current form. The decoration with icing sugar and the cross of Santiago is even more modern, being introduced in 1924.
There are two types of Santiago cake: the simple ones and the lined ones. The lined ones consist of a base of puff pastry or shortcrust pastry. Unmolding the simple ones is sometimes complicated, so you have to spread the base well with butter or, better yet, use a removable mold or a baking paper liner.
The recipe is really simple. The norm says that you have to use 33% ground almonds, another 33% sugar and 25% egg. If you add the percentages you get 91%. The remaining 9% is made up of the zest of the skin of a lemon and other flavorings that can be cinnamon, sweet wine, brandy or pomace brandy. Naturally, that 9% can be a very important amount if we are talking about 1 kg cakes, for example. It remains then to supplement the remaining weight by adding more almonds, sugar or egg. Personally, I am always inclined to use lemon and Galician pomace brandy and no cinnamon or other liquors. Galician orujo is a product of the land of the cake and gives it a very special aroma. Use a good pomace brandy. To check if it is of quality, simply place a small amount in the palm of your hand and rub with the other until it evaporates. Then you put your hands to your nose: the only aroma that should remain is that of the grape.
Some recipes introduce wheat flour and not precisely to make the lining (which it use it for sure). The authentic Santiago cake does not contain flour. Not even a tablespoon. Flour was added to reduce the amount of ground almonds and thus lower costs, although it may have an effect that some see as positive by making the cake more spongy (due to the action of gluten). If we want to make the cake somewhat fluffy, we can work it with the rods so that the trapped air inflates the result, it is not necessary to incorporate wheat flour.
Since the ingredients of the cake work with an easy proportion and there is no yeast, it is possible to make very large cakes or small tartlets the size of a cupcake. My experience says that it is easy to measure equal amounts of almond and sugar but it is not so easy to balance the proportion with the eggs. There are very large eggs and some very small ones. Sometimes we will need 4 and other times 6 eggs. I usually solve the problem by weighing the eggs and choosing the appropriate amount empirically.
INGREDIENTS (cake of just under 1 Kg / 2.2 lbs, approximately)
In a bowl, beat the eggs. Gradually add the ground almonds, beating well so that there are no lumps. Then we do the same with the sugar. Finally we add the flavorings and mix well with the help of a wooden spoon. You have to work it so that it is well mixed and much more if we want it to take on volume, although this is not essential.
Now we take a removable mold of 22 cm (9 inches) in diameter and grease it with butter so that it is easy to unmold. Preheat the oven to 180 degrees (356 F) and introduce the dough until the surface is toasted - not burnt - and when you stick a toothpick it comes out dry. 45-60 minutes of baking should be enough.
Remove from the oven and let cool before unmolding. Unmold and cover with icing sugar. If you are excited you can cut a cross of Santiago on a sheet of paper and sprinkle the glass on it to obtain the negative image. This way it will look like it was done by a professional.
The tart is well done when displayed with a roasted top and the interior is aromatic, tender and soft, with a strong almond predominance.

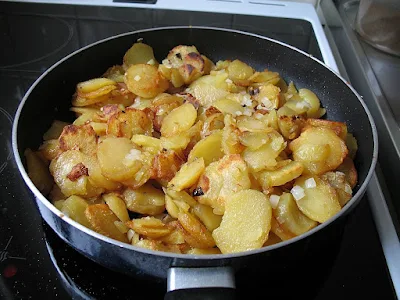
El nombre, que se pronuncia fonética en español como Jambúrguer Panfíx, procede del dialecto alemán utilizado en el norte del país donde Pfannes es sartén, fisch es pescado y Hamburger es, como sabéis, la ciudad de Hamburgo.
Básicamente se trata de pescado frito servido con salsa de mostaza
Como el nombre indica, se trata de una preparación típica de la ciudad de Hamburgo que destaca siempre, por su cercanía al mar, por la cocina de pescado.
El pannfisch se suele realizar con arenque, solla o bacalao - en realidad con abadejo, al que a menudo se hace pasar como bacalao - el cual se fríe y luego cubre con una salsa de mostaza. Aunque no es obligatorio, el plato se suele complementar con bratkartoffeln (patatas fritas con tocino y cebolla).
Así, la composición habitual del plato es una base de bratkartoffeln , encima el pescado y todo ello bañado con salsa de mostaza, aunque también es corriente que la salsa se sirva por separado y sea el comensal quien disponga de la misma a placer. Es uno de los mejores platos de pescado que existen.
Por cierto, en Hamburgo no busquéis las famosas hamburguesas porque no existen con tal nombre. La receta original de las hamburguesas se llama "buletten". Cuando en los Estados Unidos vieron que los emigrantes alemanes, la mayoría de los cuales partían del puerto de Hamburgo, comían buletten, llamaron a aquella preparación de carne picada como hamburguesas.
INGREDIENTES (4 personas)
Para hacer las bratkartoffeln
* Lo corriente es servir 200 gramos de pescado por comensal, sea cual sea el tamaño de la suprema adaptaremos las unidades a servir con el peso objetivo. A menor tamaño del pescado, más cantidad de filetes.
** Se trata de un tipo de mostaza común en Alemania y Francia más tosca que la habitual porque todavía se perciben los granos de los que se extrae. Se puede obviar usando un poco más de mostaza fuerte, aunque en la receta original se emplea este tipo.
Picamos la cebolla y la freímos en una cucharada de mantequilla . Cuando transparenta añadimos una cucharada de harina que también tostaremos. Cuando se vuelva de color marrón incorporamos la leche y llevamos a ebullición. Bajamos a continuación la potencia del fuego y cocinamos durante 5 minutos, momento en el que retiramos.
Inmediatamente añadimos la nata para cocinar, la mostaza, sal, pimienta negra molida y el pellizco de azúcar, removiendo bien. Reservamos, procurando que no se enfríe (podemos tenerlo al fuego mínimo o bien en el horno a 50 grados como máximo).
Lavamos las supremas de pescado, las secamos, salpimentamos y enharinamos. Las freímos a continuación por ambos lados durante 2 ó 3 minutos, hasta que quedan doradas. Para esta fritura emplead el aceite vegetal y una vez terminada colocáis las supremas sobre papel absorbente para eliminar el exceso de grasa.
****
Para hacer las bratkartoffeln :
Lo mejor es emplear patatas que resistan bien la cocción sin romperse. Por tanto se debe emplear patata monalisa, nueva o kennebec si hacéis la receta en España mientras que en Alemania se emplearían de tipo linzer, kipfler o sieglinde, entre otras.
Lo primero a hacer es hervir las patatas con piel. Se lavan bien y se introducen en una olla con un puñado de sal y agua a ras.
Dependiendo del tamaño de las patataspueden estar hechas entre 30 y 50 minutos, con la tapadera puesta y a fuego medio. Para comprobar que están cocidas se pinchan con un cuchillo de manera que la hoja debe penetrar aunque no con la facilidad con la que entraría en una pieza de mantequilla caliente (deben quedar firmes).
Una vez se enfrían lo suficiente para ser tocadas procedemos a pelarlas.
Lo mejor en este caso es dejar que una vez peladas enfríen del todo, incluso que se guarden en el frigorífico, para proceder a freírlas al día siguiente. Si no podéis esperar tanto, al menos hacedlas cuando se hayan enfriado del todo. Es importante que estén firmes y frías a la hora de freírlas.
En primer lugar vamos a freír las patatas en mantequilla clarificada. Así evitaremos que se queme a la temperatura a la que freiremos las patatas, que suele ser alta. Si el uso de mantequilla os pone un poco los pelos de punta, podéis sustituirla por aceite de oliva o mezclar mantequilla normal con el mismo, alcanzado un punto de temperatura óptimo sin que se queme pero sin renunciar al sabor que en principio deben tener estas patatas alemanas.
Para clarificar mantequilla basta con calentar la mantequilla en una cazuela hasta que funda en su totalidad. Se deja reposar y en unos segundos el líquido amarillento se habrá estratificado en tres capas. La superior es como una espuma que se puede eliminar con una espumadera o empleando una cucharilla. La siguiente, más clara y en mayor cantidad, es la mantequilla clarificada que se separa del suero del fondo por simple decantación.
Se cortan las patatas en rodajas de medio centímetro de grosor. Es importante que todas las rodajas tengan el mismo grosor para que se frían a la vez.
Se vierte parte de la mantequilla clarificada en una sartén a fuego medio-fuerte. Cuando está bien caliente freímos las patatas procurando no amontonarlas y que no se toquen entre ellas. Como son de cierto grosor lo normal es dejar unos 3 minutos por cada lado, hasta que los bordes se oscurecen. Procedemos así con todas las rodajas. Una vez se extraen se dejan reposar en un papel de cocina para que absorban el exceso de mantequilla.
En otra sartén también con un poco de mantequilla clarificada freímos la cebolla cortada en aros hasta que se pone crujiente.
En la misma sartén salteamos el bacon en tiras. No siempre se añaden estos ingredientes pero se suele hacer si va a constituir un plato entrante.
Finalmente mezclamos las patatas fritas con la cebolla y el bacon, salpimentándolo todo al gusto.
También es costumbre añadir cebollino picado y semillas de alcaravea.
Si no queréis usar mantequilla clarificada, podéis freír las patatas en aceite añadiendo una cucharada de mantequilla para darle un sabor muy parecido a la receta original pero con menos aporte de calorías.
*****
Si habéis preparado patatas fritas las disponéis en el fondo del plato, encima las supremas de pescado y se baña todo con la salsa de mostaza, todo ello bien caliente.
Con esta receta es difícil que alguien se niegue a comer pescado.

Le riz noir est un plat typique de la cuisine méditerranéenne espagnole, mais il est également présent dans d'autres cuisines européennes qui partagent le même littoral. La principale différence avec la paella est l'absence de légumes - à l'exception du sofrito - et bien sûr la couleur noire que lui donne l'encre de seiche.

In the Middle Ages, the Church forbade eating meat and other foods during the Lenten period as an act of penance for the death of Jesus Christ. The meals had to be frugal and the attitude of recollection. This was relatively simple to carry out since most people were starving and in reality they celebrated Lent 365 days a year without knowing it.
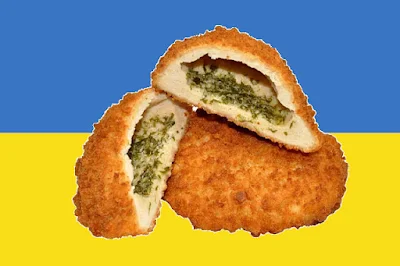
No me he inventado la receta, realmente existe un "Pollo Kiev", casi más famoso fuera que en la misma Ucrania.
A estas horas Ucrania está viviendo una auténtica pesadilla que espero acabe pronto y de la manera que a los ucranianos les gustaría que acabara. A ellos y a todos los que amamos la libertad y la democracia, claro.
Se trata de unas pechugas de pollo rellenas de una mezcla de mantequilla con ajo y perejil que se rebozan y finalmente acaban en el horno. Un plato realmente bueno.
Valga esta receta como pequeño homenaje a Kiev y a Ucrania.
INGREDIENTES (4 personas)
* Si no tenéis eneldo picado se puede emplear perejil y si queréis que tenga un relleno más mediterráneo se puede usar orégano, hierbas provenzales etc.
En un bol batimos la mantequilla a punto pomada (no líquida ni demasiado blanda) con el eneldo y el diente de ajo muy picado y sin el germen central. Salpimentamos.
Colocamos una hoja rectangular de papel film en la mesa de la cocina y dentro introducimos la mezcla anterior formando, más o menos, un cilindro alargado.
Cerramos el papel film y llevamos al congelador durante 30 minutos.
Mientras preparamos las pechugas.
Las abrimos con un corte mariposa, es decir, abiertas como un libro sin que se lleguen a separar las mitades. Las aplanamos con ayuda de un rodillo.
Salpimentamos el interior y el exterior de las pechugas.
Extraemos el cilindro de mantequilla y lo cortamos en cuatro partes iguales.
Introducimos cada una de dichas partes en el interior de las pechugas. Enrollamos la carne sobre el cilindro de mantequilla hasta que toma a su vez una forma cilíndrica. Para que os hagáis una idea, es como enrollar una alfombra.
Colocamos cada cilindro de carne en el interior de una papel film de plástico bien prieto y lo llevamos al congelador durante otra media hora.
Extraemos del congelador y los empanamos.
Para ello primero los rebozamos en harina, luego en huevo batido y finalmente en pan rallado. Salpimentamos el exterior.
En una sartén con abundante aceite vegetal freímos los rollos de pollo hasta que quedan dorados. No os preocupéis de que el interior quede crudo porque los terminaremos en el horno.
Escurrimos el pollo en una rejilla o sobre un papel absorbente.
Precalentamos el horno a 200 grados e introducimos los "kievs" durante 20-30 minutos.
Extraemos y listos para comer, acompañados de verduras o patatas fritas.