SÁBADO
DESAYUNO
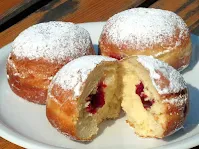
Café con leche y Berlinas

Recetas tradicionales cocinadas en media hora o menos

Uma iguaria essencial do mezze árabe. É servido como um molho espesso que deve ser espalhado sobre pão pita ou similar.
Sua origem é incerta. Alguns afirmam que é sírio-libanês, outros turcos, mas a única certeza é que é tão onipresente quanto o homus, embora muito mais desconhecido, pelo menos no Ocidente. Assim como o homus e outros molhos orientais, ele pode ser encontrado embalado em lojas de comida árabe, mas fazê-lo em casa permite regular melhor o sabor que você deseja dar a ele.
INGREDIENTES:
Vamos fazer um molho grosso. Para fazer isso, vamos picar finamente os dentes de alho e o cominho, bem como as nozes que, anteriormente, fritamos na panela com uma colher de chá de azeite.
Uma vez que tenhamos isso bem picado, vamos colocá-lo no copo da varinha com o resto dos componentes, exceto o pão pita. Damos alguns ou três golpes (para que fique grosso) e está pronto para consumir mergulhando ou espalhando pão pita. Fácil, não é?

Loukoumades are the Greek equivalent of donuts but with an oriental twist. They are found throughout the Middle East under different names but they are all the same: a dough, usually in the form of a ball or donut that is fried and then sweetened by bathing it with syrup or directly with honey. They are extremely popular in Greece and Cyprus, where they are never lacking as treats given to children or accompanying the typical cup of Greek coffee.
As touching them means getting your hands quite sticky, they are usually skewered on a toothpick to avoid direct contact, although there are some types that are quite dry and no longer need this trick. When you buy them at a street stall they are served in this way, 4 or 5 in a little cardboard tray with a toothpick stuck in each of them.
Like donuts, there are infinite varieties: with sugar glaze, with icing sugar, with a crunchy chocolate layer, fillings, etc, etc. These that I explain below are the most typical and traditional ones with a bath of honey syrup but if you do not want to have that unpleasant sensation of sticky fingers, either prick them with a toothpick or replace the syrup bath with icing sugar (increasing, yes, the amount of sugar in the dough).

Vendors of loukoumades can be found at street stalls or at fairs and amusement parks. By the way, it's quite a spectacle to go to one of those places in Greece where the attractions of the stallholders that are announced loudly through the loudspeakers to Westerners sound like someone reading a medical vademecum or a scientific manual, given the habitual use that we do for our hometowns of the Greek terms, not to advertise the "merry go round" or the "bumper cars".
The origin of the loukoumades is uncertain. Although some indicate that it is Arabic - for example, they are very popular in Saudi Arabia under the name of Loukemat - others say that they were already given as a present to Greek athletes who won competitions in the Olympics, which, if confirmed, would reveal that they have a history of more than 2,500 years.
Loukoumades are made with yeast-leavened dough that is fried in oil and then dipped in syrup (in some cases, dipped directly in honey).
INGREDIENTS
• 450 grams (1 lbs) of flour
• 250 ml (1 cup and a quarter) of water
• 250 ml (1 cup and a quarter) of milk
• 80 ml (4 tbsp) of extra virgin olive oil
• 2 tablespoons of sugar
• 20 grams (1 tbsp) of baker's yeast (dry)
• 1 pinch of salt
• Sunflower, canola or corn oil for frying
for the syrup
• 1 cup of honey (200 ml)
• 1 cup of water (200 ml)
• 3 spoonfuls of sugar
• 1 teaspoon of lemon juice
Let's first prepare the syrup. In a deep saucepan pour the three tablespoons of sugar and the teaspoon of lemon juice. Put on low heat until thick. Then add the glass of honey and the glass of water. Bring to a boil, add the honey and lower the heat so that it thickens slightly and above all so that the honey leaves its aroma. Reserve and keep warm.
Second, we are going to prepare the dough.
In a large bowl add the warm water (20 seconds in the microwave), the sugar and the yeast. Mix well and wait 10 minutes.
Then add the previously sifted flour without stopping beating, as well as the rest of the ingredients (milk, oil...) and mix well. If you have a kneading machine, it is time to use it.
Once we have a homogeneous mass, we cover it with a cotton cloth and let it rest in a warm, dark place without drafts. We will wait 1 hour for the yeast to grow.
Now we can make and fry the loukoumades.
If you have a fryer, the correct temperature to make them is 160 degrees (320 f). Otherwise, use a deep frying pan with a lot of oil (the ball of dough should not touch the bottom) over medium heat.
To make the balls, a spoon is used that is previously submerged in oil so that it does not stick. Every cook has his technique. Mine consists of taking the amount of dough that fits in a normal soup spoon and with your hand or another spoon (also previously submerged in oil) slide the ball into the hot oil. Each time a ball is made, the spoon must be previously dipped in oil (it is the same whether it is olive oil, sunflower oil or any other type).
The loukoumades will begin to fry with a lot of bubbling. When they inflate, float on the surface of the oil and look golden, remove them and let them drain on a rack or on absorbent paper. When they are fried especially that they do not touch, at least in principle. Fry a small amount at a time.
The syrup is poured over them and they are ready to eat, warm or at room temperature. When you try them you will understand why they are the favorite sweets of the Greeks and Cypriots.

Es complicado traducir el nombre de este postre de forma literal ya que de hacerlo sería "La basura del Emperador". Es preferible hablar de la Crepe del Emperador que queda mucho más elegante. El nombre auténtico, por muy escatológico que nos parezca, tiene una explicación (que por cierto, antes de que os astilléis la lengua se pronuncia como "kaiser-exmarn").
Parece ser que el cocinero de la corte austríaca ofreció el plato a la emperatriz Sissi (la misma de las edulcoradas películas protagonizadas por Romy Schneider) y ésta lo rechazó alegando que tenía aspecto de "basura". El emperador, a la vista del rechazo, lo quiso probar y le encantó, con lo que a partir de ese momento pasó a llamarse coloquialmente en las cocinas de palacio como "la basura del emperador". Parece ser que el aspecto que tomó la crepe fue debido a un error de manipulación de la misma, sin que existiera intencionalidad creativa al respecto. Esto, como podéis imaginar, es más una leyenda que probable realidad pero la consigno para dar una explicación plausible al nombre. Dudo mucho que nadie se hubiera atrevido en aquella época a dar tal nombre a una receta. Y menos estando a servicio del Emperador.
En efecto esta receta es originalmente austriaca pero también muy popular en Baviera y otras zonas del sur de Alemania, además de en Hungría por las lógicas conexiones históricas con Austria.
Básicamente se trata de hacer un crepe o panqueque para luego romperlo. Así de simple.
INGREDIENTES (4 personas)
En primer lugar separamos las yemas de las claras. Reservamos las segundas.
En un bol mezclamos las yemas, la harina previamente tamizada, la leche, el azúcar y el pellizco de sal hasta obtener una masa homogénea sin grumos. Reservamos.
En otro bol batimos las claras con un pellizco de sal y unas gotas de limón, hasta que estén firmes. Una vez ocurra esto, las vertemos sobre la masa obtenida en primer lugar y con movimientos de arriba hacia abajo circulares y lentos vamos mezclando hasta que se integran.
En una sartén antiadherente fundimos la mantequilla, incorporando a continuación la masa. Lo correcto en usar un cazo de sopa y verterlo en el centro hasta que ocupe la superficie (con eso tendremos una ración).
Incorporamos las pasas (una parte proporcional para la crepe individual que estamos haciendo). Cuando se ve que la tortita ha cuajado y empieza a oscurecerse por los bordes, con una espátula la cortamos en trozos y damos la vuelta a los mismos para que se terminen de hacer por el otro lado. Retiramos y servimos con azúcar glass por encima, compota de manzanas o salsa de ciruelas, al gusto.
Procedemos del mismo modo hasta que finalizamos la masa, aunque algunos prefieren hacerlo todo a la vez y servir una bandeja con el troceado de panqueque para que cada cual se sirva la cantidad que le apetezca.
Os prometo que sabe mejor de lo que su nombre anuncia.
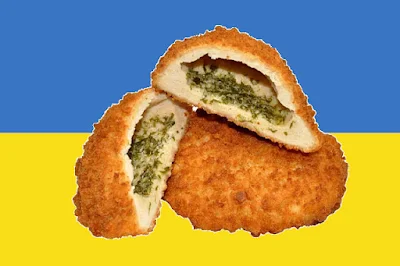
Je n'ai pas inventé la recette, il existe bien un "Poulet Kiev", presque plus célèbre à l'extérieur qu'en Ukraine même.
En ce moment, l'Ukraine vit un véritable cauchemar qui, je l'espère, se terminera bientôt et de la manière dont les Ukrainiens aimeraient qu'il se termine. À eux et à nous tous qui aimons la liberté et la démocratie, bien sûr.
Il s'agit de poitrines de poulet farcies d'un mélange de beurre avec de l'ail et du persil qui sont panées et finissent finalement au four. Un très bon plat.
Utilisez cette recette comme un petit hommage à Kiev et à l'Ukraine.
INGRÉDIENTS (4 personnes)
* Si vous n'avez pas d'aneth haché, vous pouvez utiliser du persil et si vous souhaitez une garniture plus méditerranéenne, vous pouvez utiliser de l'origan, des herbes de Provence, etc.
Dans un saladier, battez le beurre ramolli (ni coulant ni trop mou) avec l'aneth et la gousse d'ail finement hachées et sans le germe central. On sale et on poivre
Nous plaçons une feuille rectangulaire de pellicule plastique sur la table de la cuisine et à l'intérieur nous introduisons le mélange précédent en formant plus ou moins un cylindre allongé.
Nous fermons la pellicule plastique et la portons au congélateur pendant 30 minutes.
Pendant que nous préparons les poitrines.
On les ouvre avec une coupe papillon, c'est-à-dire ouverte comme un livre sans que les moitiés soient séparées. Nous les aplatissons à l'aide d'un rouleau à pâtisserie.
Assaisonner l'intérieur et l'extérieur des poitrines.
Extrayez le cylindre de beurre et coupez-le en quatre parties égales.
Nous introduisons chacune de ces parties à l'intérieur des seins. Rouler la viande sur le cylindre de beurre jusqu'à ce qu'elle prenne une forme cylindrique. Pour vous donner une idée, c'est comme rouler un tapis.
Nous plaçons chaque cylindre de viande dans une pellicule plastique très serrée et le portons au congélateur pendant encore une demi-heure.
Sortez-les du congélateur et panez-les.
Pour cela, enrobez-les d'abord de farine, puis d'œuf battu et enfin de chapelure. Nous salons l'extérieur.
Dans une poêle avec beaucoup d'huile végétale, faites frire les rouleaux de poulet jusqu'à ce qu'ils soient dorés. Ne vous inquiétez pas que l'intérieur soit brut car nous les finirons au four.
Égouttez le poulet sur une grille ou sur du papier absorbant.
Nous préchauffons le four à 200 degrés et introduisons les "kievs" pendant 20 à 30 minutes.
Nous extrayons et prêts à manger, accompagnés de légumes ou de frites.

Polenta is a typical food that is consumed as a porridge or accompaniment and whose main ingredient is cornmeal. It is typical of northern Italy but is also consumed in Romania (the famous mamaliga) and in much of South America. It is very versatile, being able to be used to make bread, as an accompaniment (instead of pasta or chips, for example) and even to make sweets like this one, known as Dolce Varese.
INGREDIENTS
• 100 grams (3.5 oz) of corn flour
• 80 grams (2.8 oz) of white wheat flour
• 100 grams (3.5 oz) of butter
• 120 grams (4.2 oz) of sugar
• 70 grams (2.5 oz) of very finely chopped almonds
• 2 eggs
• Half a cup of rum*
• 1 tablespoon of vanilla essence or 2 of vanilla sugar
• 1 sachet of baking powder
• Icing sugar
* It can be another liquor such as brandy, amaretto, etc.
First, beat the melted butter, eggs and sugar in a bowl until smooth.
Next we add little by little and well sifted the corn flour and the white flour, the chemical yeast, the vanilla, the chopped almonds and the rum. Mix well until a homogeneous mass without lumps remains.
Next, pour this dough into an elongated aluminum mold well greased with butter or silicone. The Dolce de Varese is made in an elongated mold with a typical groove, but it can be made with any other, although if you are Italian and you are used to seeing the Dolce de Varese baked in said mold, any other format will seem strange to you.
The oven is preheated to 180 degrees (356 F) and we introduce for 40 minutes. Then remove and once cold sprinkle with icing sugar.
A very easy sweet to make and that you will surely repeat.

Reconozcámoslo : a menudo hacemos recetas por el simple hecho que nos acordamos de los ingredientes y si además aportan todos el mismo peso, mucho más fácil de recordar. Ese es el caso del Bizcocho Libra o como dirían los ingleses, sus creadores, Pound Cake.
La libra inglesa equivale a 453 gramos, más o menos, y el Bizcocho Libra más auténtico y simple se compone de una libra de harina, una libra de mantequilla, una libra de azúcar y una libra de huevo. Y listo. Como con estas medidas tendríamos un bizcocho de al menos 1.8 Kg y eso tal vez sería demasiado, también se suele hacer el de media libra, con exactamente la mitad de cantidad de cada uno de los ingredientes.
A partir de esta simple receta se suelen hacer variaciones. A menudo se añaden aromatizantes - piel de naranja o limón, canela, pasas, zumo de frutas - y sobretodo se tiende a reducir la cantidad de mantequilla por aquello de hacerlo más ligero y saludable.
Si reducimos la cantidad de mantequilla - raramente se elimina del todo - se debe sustituir el peso restado por otro ingrediente. Si por ejemplo decidimos que solo vamos a usar 150 gramos de mantequilla podemos añadir 300 gramos de yogur o bien 200 de yogur y 100 gramos de crema agria (algo que los ingleses hacen muy habitualmente). También es posible usar en lugar de mantequilla mitad y mitad de yogur y aceite de girasol, por ejemplo.
Vamos a hacer un bizcocho de libra de tamaño moderado y usando muy poca mantequilla. Es decir, de media libra o menos.
INGREDIENTES
* Hay que pesar los huevos. Los de tamaño XL suelen rondar entre los 63 y los 70 gramos, así que necesitaremos alrededor de 3. En cambio con huevos de unos 50 gramos, necesitaremos 4. Por tanto hay que pesarlos y llegar a los 200 gramos. Como los huevos son los que son y no podemos fraccionarlos, si con 3 huevos tenemos un peso de 220 gramos, deberemos usar 220 gramos de harina, igual cantidad de azúcar y también de la combinación de mantequilla, aceite y yogur. Es decir, los huevos mandan.
Mezclamos la mantequilla a punto pomada con el aceite de girasol y el yogur natural usando las varillas, hasta que queda un líquido homogéneo.
Vamos añadiendo los huevos uno a uno, mezclando bien pero no integrando el siguiente hasta que el anterior no ha "desaparecido" del todo.
Una vez tenemos una especie de crema con muchas burbujas - es importante que la tenga, ya que el bizcocho no lleva levadura - vamos añadiendo poco a el azúcar hasta que se disuelva.
A continuación añadimos la harina bien tamizada para que no haga grumos y removemos bien con las varillas hasta que queda una masa con la consistencia de una papilla y bien aireada.
Mezclamos con cuidado las pasas que habremos previamente enharinado para evitar que se hundan en la mezcla (si no lo hacéis así se depositarán en el fondo del molde).
Utilizamos un molde redondo o alargado donde quepa al menos 1 Kg de masa.
Precalentamos el horno a 170 grados y horneamos durante 90 minutos. Al final, y solo al final o si vemos que se ha oscurecido demasiado antes de que transcurra el tiempo, clavamos un palillo en el centro y si sale seco, está listo.
Se pueden cambiar las pasas por fruta escarchada, frutos secos o aromatizarlo con la ralladura de la piel de una naranja o un limón (añadiendo incluso medio vaso del zumo de la fruta).
Se puede decorar o rellenar como se quiera, pero los ingleses no suelen hacerlo. Lo que sí hacen, cuando le han puesto mucha mantequilla y han optado por hacerlo en un molde alargado, es tostarlo ligeramente para usarlo como si fueran tostadas de pan, untando las rebanadas con mermelada o, por qué no, un poco más de mantequilla.
Seguro que es una receta que no se os olvidará jamás.

Der Jakobsweg führt in die nordspanische Stadt mit dem gleichnamigen Namen, wo die Überreste des Apostels ruhen. Wenn Sie dort waren, die Route gemacht oder gerade Galicien besucht haben (die Region im Nordwesten Spaniens mit einer Sprache, die dem Portugiesischen ähnelt), kennen Sie diesen beeindruckenden Kuchen wahrscheinlich bereits.
Der Santiago-Kuchen hat seinen Ursprung vermutlich im Mittelalter. Trotzdem lässt sich dokumentarisch belegen, dass das Geburtsdatum des Santiago-Kuchens aufgrund der Hinweise auf ein Dokument über die Ernährung des Lehrpersonals der Universität von Santiago de Compostela 1577 lautet, allerdings erst dem 19. Jahrhundert, indem das Rezept die aktuelle Form annimmt. Noch moderner ist die Dekoration mit Puderzucker und dem Jakobskreuz, die 1924 eingeführt wurde.
Es gibt zwei Arten von Santiago-Kuchen: die einfachen und die gefütterten. Die ausgekleideten bestehen aus einem Boden aus Blätterteig oder Mürbeteig. Das Entformen der einfachen Formen ist manchmal kompliziert, daher müssen Sie den Boden gut mit Butter bestreichen oder, noch besser, eine abnehmbare Form oder eine Backpapierfolie verwenden.
Das Rezept ist wirklich einfach. Die Norm besagt, dass Sie 33 % gemahlene Mandeln, weitere 33 % Zucker und 25 % Ei verwenden müssen. Wenn Sie die Prozentsätze addieren, erhalten Sie 91 %. Die restlichen 9 % bestehen aus der Schale einer Zitrone und anderen Aromen, die Zimt, Süßwein, Weinbrand oder Tresterschnaps sein können. Natürlich können diese 9 % eine sehr wichtige Menge sein, wenn wir zum Beispiel von 1 kg Kuchen sprechen. Es bleibt dann übrig, das Restgewicht durch Zugabe von mehr Mandeln, Zucker oder Ei zu ergänzen. Ich persönlich tendiere immer dazu, Zitronen- und galicischen Tresterschnaps zu verwenden und keinen Zimt oder andere Liköre. Der galicische Orujo ist ein Produkt aus dem Land des Kuchens und verleiht ihm ein ganz besonderes Aroma. Verwenden Sie einen guten Tresterschnaps. Um zu prüfen, ob es von guter Qualität ist, geben Sie einfach eine kleine Menge in Ihre Handfläche und reiben Sie mit der anderen, bis es verdunstet ist. Dann legt man die Hände an die Nase: Das einzige Aroma, das bleiben soll, ist das der Traube.
Einige Rezepte führen Weizenmehl ein und nicht genau, um das Futter zu machen (was es sicher verwendet). Der authentische Santiago-Kuchen enthält kein Mehl. Nicht einmal einen Esslöffel. Mehl wurde hinzugefügt, um die Menge an gemahlenen Mandeln zu reduzieren und somit die Kosten zu senken, obwohl es einen Effekt haben kann, den einige als positiv ansehen, indem es den Kuchen schwammiger macht (aufgrund der Wirkung von Gluten). Wenn wir den Kuchen etwas fluffiger machen wollen, können wir ihn mit den Stäbchen so bearbeiten, dass die eingeschlossene Luft das Ergebnis aufbläst, es ist nicht notwendig, Weizenmehl einzuarbeiten.
Da die Zutaten des Kuchens mit einem einfachen Verhältnis arbeiten und keine Hefe vorhanden ist, können sehr große Kuchen oder kleine Törtchen in der Größe eines Cupcakes hergestellt werden. Meine Erfahrung sagt, dass es einfach ist, gleiche Mengen an Mandeln und Zucker zu messen, aber es ist nicht so einfach, das Verhältnis mit den Eiern auszugleichen. Es gibt sehr große Eier und einige sehr kleine. Manchmal brauchen wir 4 und manchmal 6 Eier. Normalerweise löse ich das Problem, indem ich die Eier wiege und die geeignete Menge empirisch wähle.
ZUTATEN (Kuchen von knapp 1 kg, ungefähr)
In einer Schüssel die Eier schlagen. Die gemahlenen Mandeln nach und nach hinzufügen und gut schlagen, damit keine Klümpchen entstehen. Dann machen wir dasselbe mit dem Zucker. Zum Schluss fügen wir die Aromen hinzu und mischen gut mit Hilfe eines Holzlöffels. Sie müssen es so bearbeiten, dass es gut gemischt ist und vieles mehr, wenn wir möchten, dass es Volumen annimmt, obwohl dies nicht unbedingt erforderlich ist.
Jetzt nehmen wir eine herausnehmbare Form von 22 cm Durchmesser und fetten sie mit Butter ein, damit sie sich leicht entformen lässt. Heizen Sie den Ofen auf 180 Grad vor und geben Sie den Teig hinein, bis die Oberfläche geröstet ist – nicht verbrannt – und wenn Sie einen Zahnstocher hineinstecken, kommt er trocken heraus. 45-60 Minuten Backen sollten ausreichen.
Aus dem Ofen nehmen und vor dem Ausformen abkühlen lassen. Aus der Form lösen und mit Puderzucker bedecken. Wenn Sie begeistert sind, können Sie ein Jakobskreuz auf ein Blatt Papier schneiden und das Glas darauf streuen, um das Negativbild zu erhalten. So sieht es aus, als hätte es ein Profi gemacht.
Die Torte ist gut gemacht, wenn sie mit einer gerösteten Oberseite präsentiert wird, und das Innere ist aromatisch, zart und weich, mit einer starken Dominanz von Mandeln.

Note : the equivalence of gelatin in sheets and gelatin in powder is just given in metric system.
The term 'panna cotta' means cooked cream in Italian. It comes from Piedmont and is very popular because it is a very simple dessert, as well as tasty and cheap. To cook it we will need gelatin.
Gelatin is protein in its purest form with the almost testimonial presence of water and mineral salts. It does not contain fat, it has no flavor and it is completely assimilated by the human body - unlike fiber, for example -.
Gelatin is used as a thickener, binder and gelling agent. To gel means that the addition of gelatin to a liquid medium tends to convert said medium into gelatin, which is an intermediate stage between liquid and solid. This allows us to enjoy liquid cream, as in the case of panna cotta, as if it were a flan.
Gelatin is generally obtained from the connective tissue of cattle or pigs, although poultry and fish are also used. Gelatin is sold in transparent sheets or in granular compounds. In the recipes you can find that they give you the amount of gelatin to use as leaves or in grams. If they give you in grams and you have or can get only sheets, it is convenient to know that each sheet is equivalent to 1.5 grams, approximately. Gelatin can only be used in warm or cold foods. If it comes into contact with mixtures that are too hot, it loses its gelling power.
It also has problems with the acid in some fruits (especially pineapple and kiwi). There are other thickeners or gelling agents that complement the action of gelatins of animal origin where they do not work well. Currently, agar-agar, which has its origin in a seaweed, is widely used in haute cuisine.
Whatever the use that is going to be given to the gelatin sheets, it is essential that before use it is immersed in cold water for at least 5 minutes. This process will soften it and simply draining it completely we can use it. There is also instant gelatin powder soluble in cold water.
INGREDIENTS
• Half a liter (5 cups) of liquid cream for cooking or whipping
• A quarter of a liter (1 cup and a quarter) of milk
• 125 grams (4.4 oz) of sugar
• 6 sheets of gelatin (9 grams of powdered gelatin)
• Cinnamon stick (optional)
First, we mix the liquid cream, the milk and the sugar in a saucepan that we heat without letting it boil. If we like the taste of cinnamon, we can heat the liquids with a cinnamon stick and even with a little lemon peel. Stir continuously to prevent the sugar from sticking. When it is about to boil, remove and reserve. It is important that it does not boil or the cream could curdle.
While we heat the milk, soak the gelatin in cold water in a deep soup plate.
When the mixture of milk and cream is lukewarm, add the gelatin and stir well until it dissolves. From here we have two options: fill individual molds or fill a long mold and cut portions as we need. Gelatin lends itself quite well to the latter, since the consistency of panna cotta is greater than that of flan.
Let it cool at room temperature.
We put the mold in the fridge and the next day (8 hours) it will be ready to be consumed.
The pannacotta admits many variations such as adding a liqueur to the mix, serving with liquid chocolate or jam, decorating with berries or including them in the mix, etc.

El lángos a veces se llama la pizza húngara y de hecho se le parece bastante, aunque con sutiles diferencias. Pertenece al conjunto de panes con rellenos o toppings que abundan en Europa como el Lamadjun armenio, la Coca de Recapte leridana o la Flammkuchen alsaciana (aparte de la pizza napolitana, claro).
En principio el lángos se horneaba pero más tarde se empezó a freír en aceite, al igual que ocurre con algunos tipos de pizza napolitana. Los lángos se suelen hacer de varios tipos : rellenos, con cobertura (lo cual no excluye que además estén rellenos), salados y dulces.
El relleno se cocina en ocasiones directamente con la fritura de la masa (en este caso la mayoría de las veces es queso) mientras que en otras se cocina aparte (y suele ser calabaza).
La cobertura también se cocina aparte, si así lo precisa, depositándose sobre la masa una vez frita. Si la cobertura es dulce - nutella y mermelada son muy habituales - se coloca con el lángos caliente o ya a temperatura ambiente.
La verdad es que no hay una receta única sobre rellenos y coberturas. Ocurre un poco como con la pizza italiana, lo cual no quiere decir que un lángos con piña y pollo no sea mirada con recelo por un húngaro.
Como he dicho los rellenos más tradicionales son queso y calabaza. Para las coberturas son habituales el queso, la carne, una mezcla de queso con paprika (picante o dulce) y la nata agria. de
Esta es la típica comida húngara que se vende en puestos callejeros. También la podéis encontrar en Austria, Eslovaquia, Serbia y Rumania. No porque sea muy popular y por ello haya traspasado fronteras, si no porque en un tiempo no muy remoto todos los países que he nombrado formaban parte del Imperio Húngaro.
En la Edad Media Hungría constituyó un potente reino al cual debemos que los turcos no invadieran Europa. De hecho durante siglos fueron los únicos que plantaron cara a los Otomanos en el este del continente. En aquella época dominaban un área mucho mayor que la actual. La zona de Transilvania era húngara, así como el norte de la actual Serbia (de hecho Belgrado es una ciudad fundada por los húngaros), así como partes de Eslovaquia y la misma Austria, cuando aún no podía suponer que se convertiría en un Imperio durante el siglo XVIII. La impronta de Hungría en la Europa Oriental es de enorme importancia.
INGREDIENTES
Para la cobertura
Ponemos tibia la leche con unos 30 segundos al microondas. Desleímos la levadura y disolvemos el azúcar. Dejamos en un lugar oscuro y cálido para que la levadura crezca. Con media hora será suficiente.
En un bol grande vertemos la harina tamizada - para que no haga grumos - y le añadimos las dos cucharadas de aceite, una cucharada de agua tibia y la levadura ya crecida. Mezclamos bien y amasamos hasta que queda suave y homogénea (si tenemos una amasadora es el momento de emplearla).
Dejamos reposar la masa durante 1 hora o hasta que duplique el tamaño (en un lugar cálido y oscuro).
Separamos 5 bolas de la masa y las aplanamos, dejando los bordes un poco más gruesos. Los panes plantos deberán tener alrededor de 15 cm de diámetro (más o menos), pero adaptadlos al tamaño de la sartén.
Dejamos reposar 30 minutos para que aumenten de tamaño.
Disponemos en una sartén de abundante aceite vegetal y a fuego medio freímos los lángos por ambos lados hasta que queda dorados. Luego los escurrimos en una rejilla o sobre papel absorbente para eliminar el exceso de aceite.
En una sartén antiadherente con un poco de aceite fundimos el queso y lo vamos depositando en cada pan. A continuación espolvoreamos un poco de pimentón picante (antes de que el queso endurezca) y listo para comer. A veces, con suerte, si depositáis el queso directamente sobre el lángos recién salido de la sartén se funde y no hace falta hacerlo aparte.
Con una ensalada - que podéis montar encima, no hay problema - ya tenéis una cena lista.

O Briam grego é primo em primeiro grau do ratatouille francês, do pisto espanhol, da caponata italiana e de muitos outros ensopados de legumes presentes na cozinha mediterrânea. É muito fácil de fazer, costuma ser comido frio ou à temperatura ambiente - às vezes também quente, mas são os menos - e é acompanhado com queijo feta para aquele toque grego.
INGREDIENTES
Corte as batatas, abobrinhas e berinjelas em medalhões de meio centímetro de espessura. Estamos colocando-os em uma fonte que pode ir ao forno e que já cobrimos com um pouco de óleo. Alguns preferem fazer desordenadamente, outros cuidando da alternância batata-abobrinha-berinjela (como na foto acima).
Corte a cebola em tiras juliana e cubra os legumes com ela. Pique o dente de alho e polvilhe-o por sua vez. Descasque os tomates, retire as sementes e pique-os muito finamente, deitando-os alternadamente sobre os legumes. Tempere com sal e pimenta, polvilhe com um pouco de salsa e junte o resto do azeite, certificando-se de que cobre bem os legumes, e depois deite meio litro de água.
Introduzimos no forno pré-aquecido a 190 graus (375 F), permanecendo nele por uma hora ou até que a água evapore, deixando apenas o óleo.
Deixe esfriar e sirva com porções de queijo feta.
É realmente gostoso e saudável.

La Pastiera is a very typical cake from Naples that is usually tasted at Easter. It consists of a base of shortcrust pastry, the one that does not rise (frolla in Italian) that is filled with a cream of ricotta cheese and another of fine semolina, which gives it a grainy texture. The cake is topped with a rhomboid lattice also made with shortcrust pastry.
The most differentiating characteristics of this cheesecake is the use of many citrus fruits as flavorings and slow cooking. In fact, the paste he uses is not exactly broken, but one that uses orange blossom aroma. However, in order to simplify the recipe, we will use conventional shortcrust pastry.
INGREDIENTS
For the ricotta cream
For the semolina cream
The first thing we must do is leave the ricotta draining in a colander so that it is as dry as possible, squeezing it even if necessary. The less water you have, the better.
We cut the candied fruit very small, if possible that the orange peel predominates above all the fruits.
In a bowl, mix the ricotta with the sugar, the candied fruit, the eggs, the orange blossom water and the cinnamon powder. If we have some electric rods to mix, it is time to use them. It should be a smooth and homogeneous dough. We set aside.
In a saucepan over medium heat, add the milk, the fine semolina, the whole peel of a lemon and an orange without the white part that would make it bitter, and the butter. Let it cook until the grain swells, which is between 25 and 30 minutes. It will have the consistency of thick porridge. Remove the skins from the fruit and let cool slightly.
Next, mix the cream of wheat with the ricotta until a homogeneous dough remains. We set aside.
We spread the shortcrust pastry in a mold of about 22 cm (9 inches) not very high previously greased with butter.
Prick the base with a fork so that it does not rise too much.
Pour the mixture over the shortcrust pastry and spread.
We cut strips about 2 cm (1.3 inches) wide and about 22 cm (9 inches) long to form a rhomboid lattice on the cake.
We preheat the oven to 150 degrees (300 F) and introduce the cake. We let it cook for about two hours. After 90 minutes we will check if the cake is done sticking a toothpick in the center. If it comes out dry when you take it out, it's ready.
When it is ready, turn off the oven but leave it inside for half an hour with the oven door ajar (placing a wooden spoon or similar).
Remove from the oven and let cool. It is never kept in the fridge but it lasts quite well for at least 48 hours, as long as it is not too hot.
The aroma that it gives off during baking is already nourishing in itself. Imagine giving the Pastiera the first bite.

La Piadina se puede considerar una especie de pan poco levado que se dobla en forma de media luna o triángulo para encerrar algún tipo de relleno, que puede ser tan simple como queso con rúcula. Es muy típica de la región italiana de Emilia-Romagna de donde se considera originaria (de hecho allí no dicen simplemente Piadina, si no que le añaden la coletilla Romagnola).
La Emilia-Romagna (formada como os habéis imaginado por las regiones de Emilia y Romagna) limita al norte con la Lombardía y el Véneto. La ciudad más importante es Bolonia pero en su interior hay algunos mitos gastronómicos como Módena y Parma, entre otros, origen del Vinagre de ídem, o el Prosciutto o el queso Parmesano.
La Piadina tiene consideración de comida rápida, por lo que en la zona es posible adquirirla en puestos callejeros al igual que ocurre con la Pizza al Taglio, las Fiore di Zucca y otras especialidades italianas.
Por cierto, por si alguna vez os habéis preguntado al despertaros por la mañana qué comen en la República de San Marino, es probable que muchos de los habitantes se desayunen o coman a lo largo del día alguna Piadina a forma de snack rápido.
INGREDIENTES :
Para la piadina
En un bol grande vertemos la harina tamizada y le añadimos los componentes secos, con la manteca a punto de pomada. Mezclamos bien.
Vamos añadiendo poco a poco el agua, mezclando y amasando a la vez hasta obtener una bola homogénea.
Dividimos en cuatro la masa obtenida y las aplanamos con un rodillo hasta obtener unos círculos de unos 6 mm de grueso (la masa de la Piadina es bastante gruesa).
En una sartén grandes a fuego medio llevamos estas láminas y las dejamos hacer hasta que se tuestan, volteándolas con un plato o una espátula ancha. Si se forman burbujas grandes, es conveniente pincharlas con un tenedor.
Se colocan en un plato y se rellenan con Prosciutto, queso, dos o tres rodajas de tomate y la rúcula. Si aún lo queréis más simple, basta con rellenarlas de queso y rúcula. Luego se doblan por la mitad para darles forma de media luna. El relleno se puede hacer cuando aún está caliente y consumirse de tal forma o bien a temperatura ambiente.
Uno de esos "bocatas" que te abren el apetito nada más verlos.

Πρόκειται για ένα από τα πιο διάσημα κέικ στις Ηνωμένες Πολιτείες για την εντυπωσιακή του γεύση και την ευκολία παρασκευής του, αφού καταρχήν δεν χρειάζεται ψήσιμο. Ωστόσο, έχει ένα πρόβλημα, καθώς χρησιμοποιεί ωμά αυγά στο κουρκούτι και επομένως είναι πιθανό να είναι πηγή σαλμονέλας. Για να το αποφύγετε, μπορείτε να χρησιμοποιήσετε παστεριωμένους κρόκους ή να κάνετε μια σπιτική παστερίωση αυγών για την οποία θα χρειαστείτε θερμόμετρο κουζίνας.
ΣΥΣΤΑΤΙΚΑ:
για τη βάση
για γέμιση
Για "topping" (προαιρετικό)
* Το λεμόνι δεν μπορεί να χρησιμοποιηθεί, πρέπει να είναι λάιμ. Για να πάρετε μισό ποτήρι χρειάζεστε 6 με 8 λάιμ, ανάλογα με το μέγεθος.
** Αν οι κρόκοι είναι παστεριωμένοι, πολύ καλύτερα. Διαφορετικά, είναι προτιμότερο να παστεριώνουμε τη γέμιση. Μετά θα εξηγήσω πώς γίνεται.
Πρώτα θα φτιάξουμε τη βάση. Γι' αυτό καλό είναι να υπάρχει καλούπι με αποσπώμενη βάση και φυσικά, αν και συνηθισμένο, από μέταλλο.
Ανακατεύουμε τα θρυμματισμένα μπισκότα με το βούτυρο μέχρι να πάρουμε την αλοιφή (μαλακή, αλλά όχι υγρή) και τη ζάχαρη. Ανακατεύουμε καλά να γίνει μια πάστα.
Μοιράζουμε τη ζύμη που προκύπτει από τη βάση της φόρμας (στύβοντας καλά με τη βοήθεια ενός κουταλιού) και ανασηκώνουμε μέρος της από τα τοιχώματα για να δώσει την άκρη του κέικ. Βάλτε στο ψυγείο.
Για να φτιάξετε τη γέμιση, αν έχετε παστεριωμένους κρόκους αβγών, απλά ανακατέψτε τους με το συμπυκνωμένο γάλα και το χυμό λεμονιού, χτυπώντας καλά.
Διαφορετικά, χωρίζουμε τα ασπράδια από τους κρόκους και ανακατεύουμε καλά με το συμπυκνωμένο γάλα και το χυμό λάιμ. Βάζουμε σε κατσαρόλα και σε πολύ χαμηλή φωτιά, χωρίς να σταματήσουμε το ανακάτεμα, κρατάμε για περίπου 3 λεπτά σε θερμοκρασία 80 βαθμών (να με θερμόμετρο). Δεν μπορεί να είναι λιγότερο, γιατί δεν θα ήταν αποτελεσματικό, ούτε περισσότερο, διαφορετικά θα χανόταν η εγγενής γεύση του κέικ.
Ρίχνουμε τη γέμιση πάνω από τη βάση του θρυμματισμένου μπισκότου και ξαναβάζουμε στο ψυγείο για περίπου 8 ώρες (όλη τη νύχτα).
Πριν σερβίρουμε το κέικ χτυπάμε την κρέμα γάλακτος με τη ζάχαρη μέχρι να πήξει. Τοποθετείται σε σακούλα ζαχαροπλαστικής και σκαλίζεται ή απλώνεται ένα περίγραμμα σε όλη την επιφάνεια.
Να γλείφεις τα δάχτυλά σου, αλήθεια.
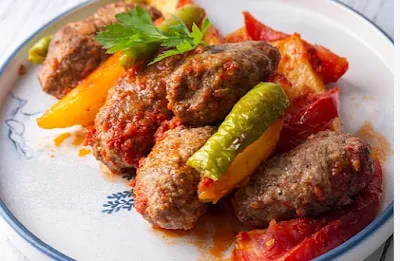
Sutzukakia is a very popular recipe in Greece. Like the moussaka and other Greek dishes, it is really made with lamb meat, but it can be substituted with 50% pork and 50% beef to reduce the price.
INGREDIENTS (4 people) :
• 500 grams (1.1 lbs) of minced lamb meat (with as little fat as possible)
• 1 egg
• 1 large onion
• 8 ripe tomatoes
• Stale bread
• Garlic
• Parsley
• Vinegar
• Red wine
• Wheat flour
• Salt
• Black pepper
• extra virgin olive oil
The preparation of this dish consists of two phases. The first is to make the meatballs and the second is to cook the sauce.
First, soak the stale bread (2 or 3 slices will suffice) in water until it softens. Remove and drain by placing on absorbent paper.
In a bowl, mix the minced meat, the egg, two finely chopped garlic cloves, a tablespoon of vinegar and the onion and a little chopped parsley, as well as salt and black pepper (with a teaspoon and a half of the latter, respectively, should be enough). If the dough is very liquid, add little by little wheat flour.
With the resulting dough we make small cylinders (somewhat larger than conventional croquettes) and put them in the fridge for an hour.
While we prepare the sauce, which is nothing more than making a fried tomato sauce with a glass of red wine. When the fattening sauce will be ready. Although some recipes indicate adding flour, I do not recommend it.
Now we are going to fry the meat cylinders. We pass them through flour for batter and keep them in the pan until they are golden. It is opportune to split one, once the frying seems good, to make sure that it is not raw inside. If that happens, you fry them more until they are black, you simply put them in the oven at 180 degrees (356 F) for about 10 minutes and that's it. Then it is convenient to remove excess oil by placing them on absorbent paper.
It is time to take the fried balls and put them in the sauce to cook the whole for about 10 minutes, stirring carefully.
They are often served with chillies, chips or rice.

Un postre francés que encanta a los muy chocolateros. Consiste en hacer una base de chocolate a la que se agrega claras montadas y luego se hornea. Es muy fácil de hacer siguiendo unas pocas reglas básicas.
INGREDIENTES (4 personas)
Lo primero que debemos hacer es precalentar el horno a 200 grados. Es muy importante que ya esté a la temperatura correcta cuando introduzcamos el souffle.
En primer lugar ponemos al fuego un olla grande con agua. En una olla más pequeña que la anterior introducimos la tableta de chocolate hecha en trozos con la leche y la metemos en la primera (cuidado con que el agua no desborde). Así la fundimos, al baño maría. Aunque la cantidad de azúcar a introducir dependerá de la que lleve la tableta, en principio vertemos unos 80 gramos de azúcar glass. Removemos bien para que se mezcle, ahora ya a fuego muy bajo.
Separamos las claras de las yemas.
Batimos las yemas con las varillas y añadimos el cacao en polvo. Incorporamos las yemas al chocolate fundido al baño maría, mezclamos bien y ya podemos retirar del fuego. Reservamos.
Ahora vamos a montar las claras.
Batimos las claras con las varillas y para que monten más rápido añadimos unas gotas de zumo de limón y un pellizco de sal. A medio montar añadimos los restantes 70 gramos de azúcar. Deben quedar muy bien montadas, de manera que al girar el bol las claras no caigan.
Ahora vamos a mezclar las claras montadas con el chocolate. Con movimientos suaves de arriba a abajo y empleando una paleta ancha vamos introduciendo las claras montadas en el chocolate - nunca al revés - hasta que quedan bien integradas. Reservamos.
En un molde de silicona de unos 20 cm de diámetro u otro de aluminio desechable muy engrasado, introducimos la masa obtenida. Debe quedar lleno en unas tres cuartas partes para que no desborde demasiado (lo hará, pero no caerá por los lados).
Introducimos en el horno exactamente 30 minutos, ni uno más ni uno menos. Y nada de abrir para comprobar cómo está. Si lo hacéis se vendrá abajo y en lugar de souffle tendréis una especie de empanada.
Se sirve de inmediato, no se deja enfriar (como mucho se permite que quede a una temperatura suficiente para manipularlo sin problemas).
Un auténtico festín.